#1 Room 소개
Room을 사용하여 로컬 데이터베이스에 데이터 저장 | Android Developers
Room 라이브러리를 사용하여 더 쉽게 데이터를 유지하는 방법 알아보기
developer.android.com
SQLite는 모바일 기기를 위한 SQL Database 엔진이다. SQLite는 수 많은 Android 기기에 탑재되어있다. 안드로이드 개발자라면 SQLite를 잘 다룰 수 있어야 한다. 하지만, SQLite를 생으로 다루는 것은 쉽지 않다. 반복되는 Database Query문 등과 같은 많은 상용구 코드를 반복적으로 적어주어야 하기 때문이다. 그렇기에, Database 작업에 많은 시간이 소요된다. 이상적인 그림이 아니다. 이런 문제를 개선하기 위해서, 구글의 Room Database persistence 라이브러리가 출시되었다.
Room은 그 자체가 SQLite를 감싸는 추상화 계층이다. 그렇게, SQLite의 모든 기능을 매끄럽게 사용하기 위함이다. Room은 SQLite 사용 절차의 많은 부분을 암시적으로 수행하기에, 코드량을 줄일 수 있다.
Room은 프로그래머가 입력한 Annotation을 인식하여 동작한다. Anonotation에 따라 적절한 동작이 암시적으로 수행되는 것이다. Room을 사용할 때는 3가지 클래스가 이용된다. 첫째는, Database의 테이블을 대변하는 Entity 클래스. Annotation은 @Entity다. 둘째는, Database에 접근하는 메소드를 구현하는 DAO(Database Access Object Interface) 클래스. Annotation은 @Dao다. 셋째는, 실제 SQLite 데이터베이스를 대변하는 Database 클래스. Annotation은 @Database다.
#2 Room의 기본을 담은 샘플 앱 개요
[Android] MVVM 구조 한눈에 보기
#1 안드로이드 앱의 '전통적인' 방식 vs MVVM 패턴 #1-1 도식도와 종속성 화살표는 클래스 간의 종속성을 나타낸다. 예를 들어, View는 ViewModel에 종속된다. 종속의 사전적 의미는 '자주성이 없이 주가
kenel.tistory.com
위 게시글의 #1-3과 같은 MVVM 패턴 구조를 가지는 샘플 앱을 만들어 본다. 위 게시글의 #1-3 우측 하단에 있는 Remote Data Source 부분은 본 샘플에서는 제외한다.
#3 샘플 앱 제작 - 완성된 앱 미리보기
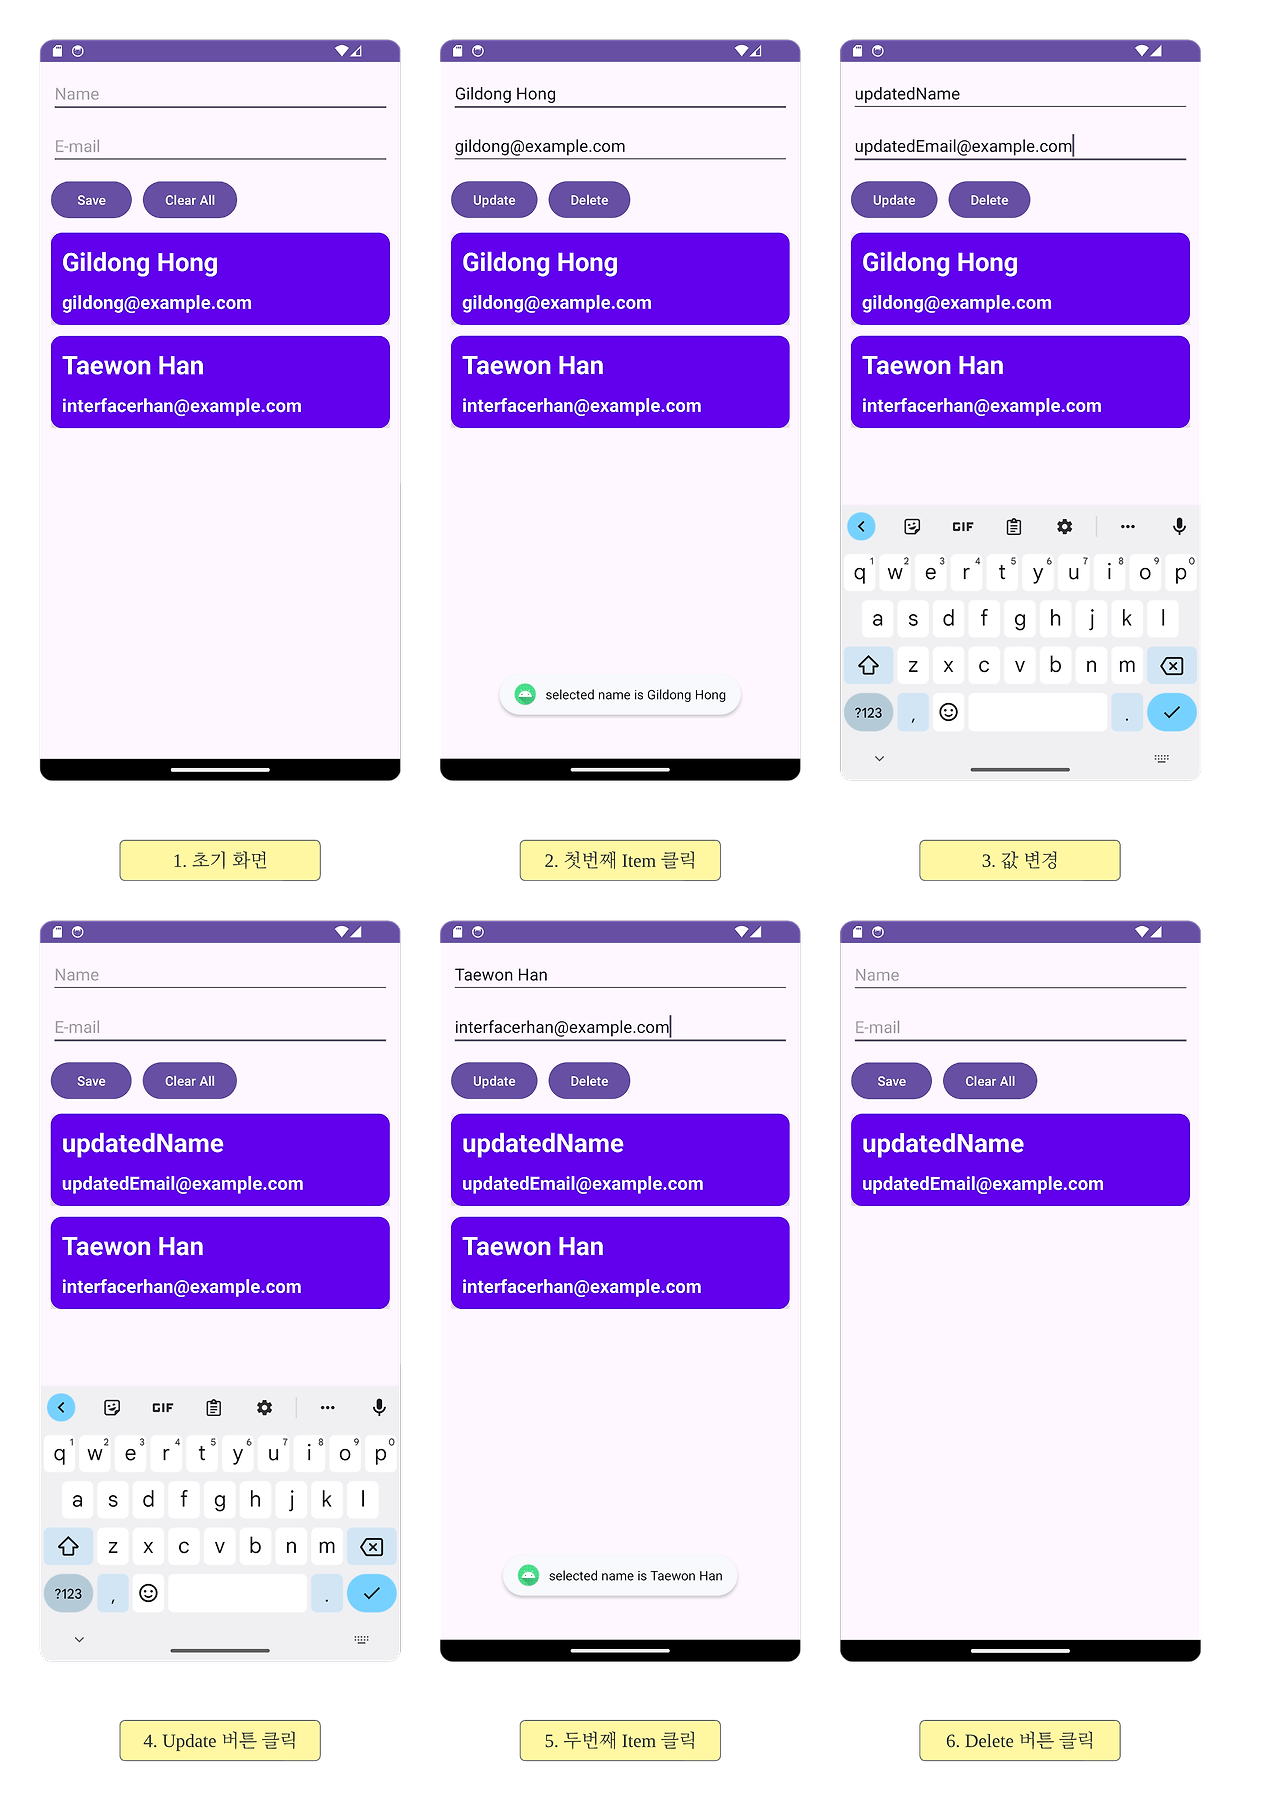
완성된 앱의 스크린샷을 가져왔다. 위와 같은 모습이 되게 만들 것이다. 아랫 부분에 있는 RecyclerView의 Item을 클릭하면 버튼의 Text와 기능이 바뀌게 만들 것이다.
#4 샘플 앱 제작 - build.gradle.kts (Module) 수정하기
plugins {
    ...
    // kapt (Annotation 읽기)
    id("kotlin-kapt")
}

android {
    ...
    // Data binding
    buildFeatures {
        dataBinding = true
    }
}

dependencies {
    ...

    val lifecycleVersion = "2.7.0"
    val roomVersion = "2.6.1"
    val coroutinesVersion = "1.7.3"

    // ViewModel
    implementation("androidx.lifecycle:lifecycle-viewmodel-ktx:$lifecycleVersion")

    // LiveData
    implementation("androidx.lifecycle:lifecycle-livedata-ktx:$lifecycleVersion")
    implementation ("androidx.lifecycle:lifecycle-common-java8:$lifecycleVersion")

    // Room
    implementation ("androidx.room:room-runtime:$roomVersion")
    implementation ("androidx.room:room-ktx:$roomVersion") // 공식 문서에서는 Optional이라고 되어 있다. 설명 참조.

    // kapt (Annotation 읽기)
    kapt ("androidx.room:room-compiler:$roomVersion")

    //Coroutines
    implementation("org.jetbrains.kotlinx:kotlinx-coroutines-core:$coroutinesVersion")
    implementation("org.jetbrains.kotlinx:kotlinx-coroutines-android:$coroutinesVersion")
}
Data binding, ViewModel, LiveData, Coroutines 라이브러리를 추가한다. 추가로, Annotation 구문을 읽는 라이브러리인 kotlin-kapt 라이브러리도 넣는다. 마지막으로, Room 라이브러리들을 추가한다. room-runtime은 필수고, room-ktx는 선택적(Optional)으로 implementation하라고 공식문서에 나와 있다. room-ktx는 Room에서 사용할 수 있는 Coroutines 클래스 라이브러리다. Room을 Background 스레드에서 돌리기 위해서, Coroutines을 사용할 것이므로 추가한다.
#5 샘플 앱 제작 - Entity, DAO, Database, Repository 클래스 구현
#5-1 Entity, DAO, Database
[Android] Room - Entity, DAO, Database
#1 이전 글 https://kenel.tistory.com/120 본 게시글은 Room의 기본을 담은 앱을 만들기 위한 이전 게시글에서 이어진다. 여기서 Room의 3가지 핵심 클래스인 Entity 클래스, DAO 클래스, Database 클래스의 구현
kenel.tistory.com
Model에 해당하는, Room의 3가지 핵심 클래스인 Entity 클래스, DAO 클래스, Database 클래스를 구현한다. Room의 핵심이기 때문에 별도의 게시글로 뺐다.
#5-2 Repository (UserRepository.kt)
// package com.example.roombasics.db

class UserRepository(private val dao: UserDAO) {

    val users = dao.getAllUsers()

    suspend fun insert(user: User) {
        dao.insertUser(user)
    }

    suspend fun update(user: User) {
        dao.updateUser(user)
    }

    suspend fun delete(user: User) {
        dao.deleteUser(user)
    }

    suspend fun deleteAll() {
        dao.deleteAll()
    }
}
Repository 클래스의 생성자에 DAO를 매개변수로 넣는다. Repository에서 DAO의 메소드들을 호출할 것이기 때문이다. dao.getAllUsers()는 suspend 키워드가 붙지 않은 함수이기에 그 return값을 users라는 프로퍼티에 담았다. suspend 키워드가 붙은 함수라면 불가능했을 것이다. (여기 참조. 여담으로, 해당 게시글에서 만든 insertUser2() 등은 일부러 구현하지 않았다.)
#6 샘플 앱 제작 - Repository, ViewModel, Activity, Data Binding 구현
[Android] MVVM 구조 한눈에 보기
#1 안드로이드 앱의 '전통적인' 방식 vs MVVM 패턴 전통적인 방식에서는 Activity가 UI 로직(화면 표시 및 사용자 상호작용 처리)과 비즈니스 로직(데이터 처리, 네트워크 호출 등)을 모두 담당했다. 따
kenel.tistory.com
위 게시글에 기반하여 MVVM 패턴을 완성한다.
#6-1 activity_main.xml
<?xml version="1.0" encoding="utf-8"?>
<layout xmlns:android="http://schemas.android.com/apk/res/android"
    xmlns:tools="http://schemas.android.com/tools">

    <LinearLayout
        android:layout_width="match_parent"
        android:layout_height="match_parent"
        android:layout_margin="12sp"
        android:orientation="vertical"
        tools:context=".MainActivity">

        <EditText
            android:id="@+id/name_text"
            android:layout_width="match_parent"
            android:layout_height="wrap_content"
            android:layout_marginBottom="12sp"
            android:ems="10"
            android:hint="Name"
            android:inputType="text" />

        <EditText
            android:id="@+id/email_text"
            android:layout_width="match_parent"
            android:layout_height="wrap_content"
            android:layout_marginBottom="12sp"
            android:ems="10"
            android:hint="E-mail"
            android:inputType="text" />

        <LinearLayout
            android:layout_width="match_parent"
            android:layout_height="wrap_content"
            android:layout_marginBottom="12sp"
            android:orientation="horizontal">

            <Button
                android:id="@+id/save_or_update_button"
                android:layout_width="wrap_content"
                android:layout_height="wrap_content"
                android:layout_marginEnd="12sp" />

            <Button
                android:id="@+id/clear_all_or_delete_button"
                android:layout_width="wrap_content"
                android:layout_height="wrap_content" />
        </LinearLayout>

        <androidx.recyclerview.widget.RecyclerView
            android:id="@+id/user_recycler"
            android:layout_width="match_parent"
            android:layout_height="wrap_content" />
    </LinearLayout>
</layout>
데이터 바인딩을 사용할 것이므로, 선제적으로 전체 코드를 <layout> 태그로 감쌌다.
#6-2 ViewModel (UserViewModel.kt)
// package com.example.roombasics

import androidx.lifecycle.MutableLiveData
import androidx.lifecycle.ViewModel
import androidx.lifecycle.viewModelScope
import com.example.roombasics.db.User
import com.example.roombasics.db.UserRepository
import kotlinx.coroutines.Dispatchers
import kotlinx.coroutines.launch

class UserViewModel(private val repository: UserRepository) : ViewModel() {

    val users = repository.users // 현재 저장된 User들
    val inputtedUser = MutableLiveData<User>() // View의 입력 박스와 바인딩된 객체

    private var isUpdateOrDelete = false
    val saveOrUpdateButtonText = MutableLiveData<String>()
    val clearAllOrDeleteButtonText = MutableLiveData<String>()

    init {
        initSaveAndClearAll()
    }

    // 초기화 관련
    fun initSaveAndClearAll() {
        clearInputBox()
        renewButtonText()
    }

    fun initUpdateAndDelete(user: User) {
        TODO()
    }

    // 버튼 클릭 시 동작
    fun saveOrUpdate() {
        if (isUpdateOrDelete) {
            // Update 작업
            TODO()
        } else {
            // Save 작업
            insert(inputtedUser.value!!)
            clearInputBox()
        }
    }

    fun clearAllOrDelete() {
        if (isUpdateOrDelete) {
            // Delete 작업
            TODO()
        } else {
            // Clear All 작업
            clearAll()
        }
    }

    // Repository 동작과 관련된 메소드들
    fun insert(user: User) = viewModelScope.launch(Dispatchers.IO) {
        repository.insert(user)
    }

    fun update(user: User) = viewModelScope.launch(Dispatchers.IO) {
        TODO()
    }

    fun delete(user: User) = viewModelScope.launch(Dispatchers.IO) {
        TODO()
    }

    fun clearAll() = viewModelScope.launch(Dispatchers.IO) {
        repository.deleteAll()
    }

    // 기타 UI 다듬기용 메소드들
    private fun clearInputBox() {
        inputtedUser.value = User(0, "", "")
    }

    private fun renewButtonText() {
        if (isUpdateOrDelete) {
            saveOrUpdateButtonText.value = "Update"
            clearAllOrDeleteButtonText.value = "Delete"
        } else {
            saveOrUpdateButtonText.value = "Save"
            clearAllOrDeleteButtonText.value = "Clear All"
        }
    }
}
ViewModel 클래스의 생성자에 Repository를 넣는다. Repository는 ViewModel과 DAO를 잇는 징검다리 역할을 한다. 이미 저장된 User 객체의 List인 users 프로퍼티와 View에 실시간으로 입력되는 정보를 따르는 MutableLiveData<Users>()형 inputtedUser가 서로 구분되어 프로퍼티로 존재한다. 2개의 버튼은 각각 2가지 상황에 따라 다른 Text를 표시한다. 그 상황은 isUpdateOrDelete의 true or false로 나타내며, 상황의 전환은 initSaveAndUpdate() 함수 또는 initUpdateAndDelete() 함수를 통해 진행한다. 곳곳에 있는 TODO()는 이어지는 게시글에서 구현한다.
#6-3 ViewModelFactory (UserViewModelFactory.kt)
// package com.example.roombasics

import androidx.lifecycle.ViewModel
import androidx.lifecycle.ViewModelProvider
import com.example.roombasics.db.UserRepository

class UserViewModelFactory(private val repository: UserRepository) : ViewModelProvider.Factory {
    override fun <T : ViewModel> create(modelClass: Class<T>): T {
        if (modelClass.isAssignableFrom(UserViewModel::class.java)) {
            return UserViewModel(repository) as T
        }
        throw IllegalArgumentException("Unknown ViewModel Class")
    }
}
#6-2의 ViewModel은 매개변수가 존재하므로, ViewModelFactory를 만들어주어야 한다.
#6-4 다시 activity_main.xml
<?xml version="1.0" encoding="utf-8"?>
<layout xmlns:android="http://schemas.android.com/apk/res/android"
    xmlns:tools="http://schemas.android.com/tools">

    <data>

        <variable
            name="userViewModel"
            type="com.example.roombasics.UserViewModel" />
    </data>

    <LinearLayout ...>

        <EditText
            android:id="@+id/name_text"
            ...
            android:text="@={userViewModel.inputtedUser.name}" />

        <EditText
            android:id="@+id/email_text"
            ...
            android:text="@={userViewModel.inputtedUser.email}" />

        <LinearLayout ...>

            <Button
                android:id="@+id/save_or_update_button"
                ...
                android:onClick="@{() -> userViewModel.saveOrUpdate()}"
                android:text="@={userViewModel.saveOrUpdateButtonText}" />

            <Button
                android:id="@+id/clear_all_or_delete_button"
                ...
                android:onClick="@{() -> userViewModel.clearAllOrDelete()}"
                android:text="@={userViewModel.clearAllOrDeleteButtonText}" />
        </LinearLayout>

        <androidx.recyclerview.widget.RecyclerView .../>
    </LinearLayout>
</layout>
ViewModel을 View(activity_main.xml)에서 받아 사용(데이터 바인딩)하기 위해서 #6-1의 코드를 위와 같이 수정한다.
#6-5 Activity (MainActivity.kt)
// package com.example.roombasics

import android.os.Bundle
import android.util.Log
import androidx.appcompat.app.AppCompatActivity
import androidx.databinding.DataBindingUtil
import androidx.lifecycle.Observer
import androidx.lifecycle.ViewModelProvider
import com.example.roombasics.databinding.ActivityMainBinding
import com.example.roombasics.db.UserDatabase
import com.example.roombasics.db.UserRepository

class MainActivity : AppCompatActivity() {

    private lateinit var binding: ActivityMainBinding
    private lateinit var userViewModel: UserViewModel

    override fun onCreate(savedInstanceState: Bundle?) {
        super.onCreate(savedInstanceState)
        binding = DataBindingUtil.setContentView(this, R.layout.activity_main)

        val dao = UserDatabase.getInstance(application).userDAO
        val repository = UserRepository(dao)
        val factory = UserViewModelFactory(repository)
        userViewModel = ViewModelProvider(this, factory)[UserViewModel::class.java]

        binding.userViewModel = userViewModel
        binding.lifecycleOwner = this

        displayUsersList()
    }

    private fun displayUsersList() {
        userViewModel.users.observe(this, Observer {
            Log.i("interfacer_han", it.toString())
        })
    }
}
DAO 인스턴스로 Repository 인스턴스를 만든다. 만든 Repository 인스턴스로 ViewModelFactory 인스턴스를 만들고, 그 ViewModelFactory 인스턴스로 ViewModel 인스턴스를 만든다. ViewModel 인스턴스를 activity_main.xml과 데이터 바인딩하고, LiveData의 동작을 위해 데이터 바인딩 객체에 LifecycleOwner를 구현하는 Activity 자기 자신도 넘겨준다. ViewModel의 LiveData형 프로퍼티인 Users를 LiveData.observe()하여 그 변동사항을 Log 메시지로 표시하게 만든다.
#7 작동 확인
RecyclerView의 구현이 남았지만, 지금까지 완성한 앱의 작동을 확인해본다.
#7-1 스크린샷
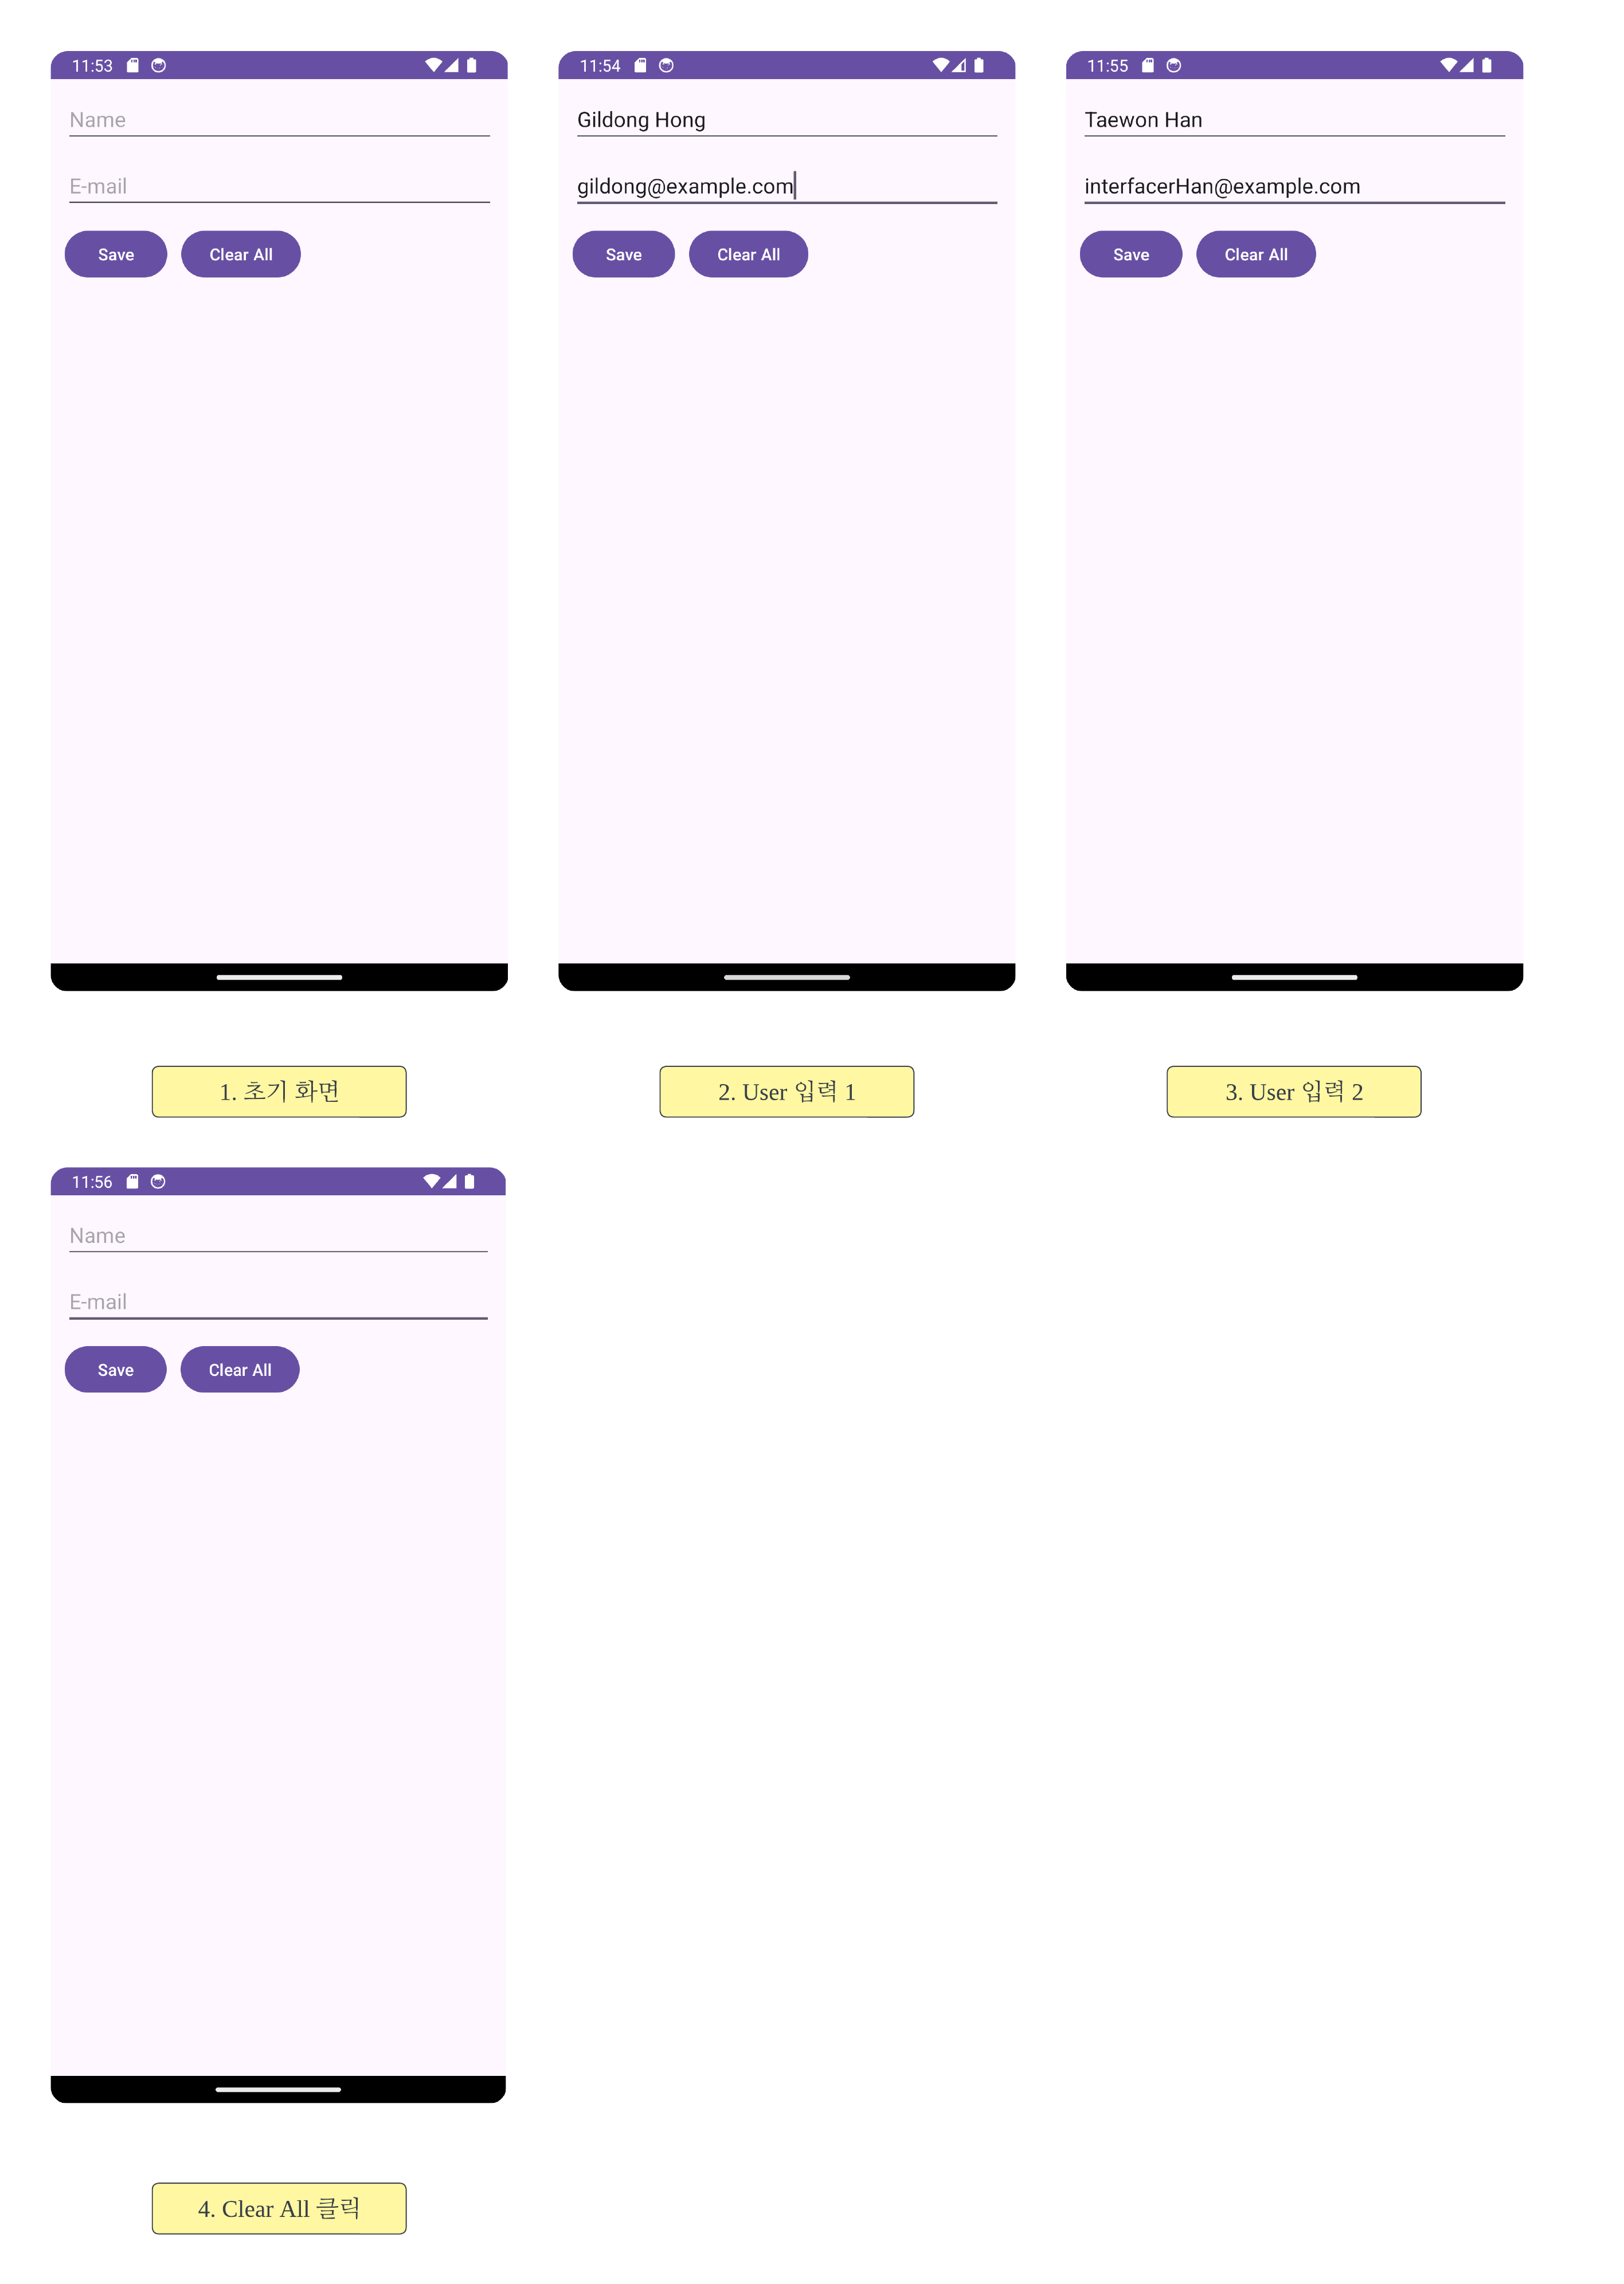
#7-2 Log 메시지
1. 초기화면 []
2. 첫번째 User 입력 후 Save 버튼 클릭 [User(id=1, name=Gildong Hong, email=gildong@example.com)]
3. 두번째 User 입력 후 Save 버튼 클릭 [User(id=1, name=Gildong Hong, email=gildong@example.com), User(id=2, name=Taewon Han, email=interfacerHan@example.com)]
4. Clear All 버튼 클릭 []
#8 요약
Room은 SQLite의 세련된 사용이다.
#9 완성된 앱
android-practice/room/RoomBasics at master · Kanmanemone/android-practice
Contribute to Kanmanemone/android-practice development by creating an account on GitHub.
github.com
#10 이어지는 글
[Android] Room - UPDATE 연습
#1 이전 글 [Android] Room - 기초, INSERT와 DELETE 연습 #1 Room 소개 Room을 사용하여 로컬 데이터베이스에 데이터 저장 | Android Developers Room 라이브러리를 사용하여 더 쉽게 데이터를 유지하는 방법 알아보
kenel.tistory.com
이어지는 글에서, 각 Entity가 하나의 Item으로서 담겨있는 RecyclerView까지 구현해본다. 여기에, RecyclerView의 Item을 클릭하여 해당 Item에 담긴 Entity을 UPDATE할 수도 있게 만들어본다.
'깨알 개념 📑 > Android' 카테고리의 다른 글
| [Android] Room - UPDATE 연습 (0) | 2024.02.26 |
|---|---|
| [Android] Room - Entity, DAO, Database (1) | 2024.02.24 |
| [Kotlin] Coroutines - LiveData Builder (0) | 2024.02.22 |
| [Kotlin] Coroutines - LifecycleScope (0) | 2024.02.21 |
| [Android] RecyclerView - Adapter에 인자(Argument) 전달 (0) | 2024.02.03 |