#1 이전 글
[Android] Retrofit - 배경과 구조
#1 Restrofit의 배경#1-1 REST API REST API (REpresentational State Transfer Application Programming Interface)#1 무엇(What)에 대한 API인가?#1-1 개요REST(REpresentational State Transfer) 또는 RESTful API는 서버의 자원(Resource)을 두고
kenel.tistory.com
이전 글에서 Retrofit의 배경과 구조를 살펴봤다. 이번엔 실제 Retrofit을 사용한 앱을 만들어본다.
#2 통신할 서버
JSONPlaceholder - Free Fake REST API
{JSON} Placeholder Free fake and reliable API for testing and prototyping. Powered by JSON Server + LowDB. Serving ~3 billion requests each month.
jsonplaceholder.typicode.com
위 사이트는 앱 프로토타이핑이나 공부를 하는 사람들에게 제공하는 목적으로, JSON 형식으로 된 자원(Resource)을 제공한다. 본 게시글에서는 이 URL의 데이터를 GET하는 걸 목표로 삼는다.
#3 Retrofit 사용을 위한 환경 설정
#3-1 AndroidManifest.xml에서 권한 허용
<?xml version="1.0" encoding="utf-8"?>
<manifest xmlns:android="http://schemas.android.com/apk/res/android"
    xmlns:tools="http://schemas.android.com/tools">

    <uses-permission android:name="android.permission.INTERNET" />
    <uses-permission android:name="android.permission.ACCESS_NETWORK_STATE" />
    <uses-permission android:name="android.permission.ACCESS_WIFI_STATE" />

    <application
        ...
    </application>

</manifest>
인터넷, 네트워크 상태, 와이파이 상태에 접근할 수 있는 권한을 넣는다.
#3-2 Retrofit 라이브러리 추가 (모듈 수준 build.gradle)
plugins {
    ...
}

android {
    ...
}

dependencies {

    ...

    // Retrofit
    val retrofitVersion = "2.9.0"
    implementation("com.squareup.retrofit2:retrofit:$retrofitVersion")
    implementation("com.squareup.retrofit2:converter-gson:$retrofitVersion")
}
Retrofit 라이브러리를 모듈 수준 build.gradle에 추가한다. 여기(공식 사이트)에서 Retrofit 사용을 위해 추가해야하는 dependencies 목록을 확인할 수 있다. GSON Converter 라이브러리도 추가한다. 이 라이브러리는 JSON을 Kotlin의 데이터 형식으로 파싱하는 역할을 수행한다.
만약, 서버가 클라이언트로 보내는 데이터가 JSON 형식이 아니라 XML이라면, 위 공식 문서의 설명대로 GSON 대신 Simple XML Converter 라이브러리를 추가하면 된다.
#3-3 Coroutine, LiveData 라이브러리 추가 (모듈 수준 build.gradle)
plugins {
    ...
}

android {
    ...
}

dependencies {

    ...

    // Retrofit
    ...

    // Coroutines
    val coroutinesVersion = "1.6.4"
    implementation("org.jetbrains.kotlinx:kotlinx-coroutines-core:$coroutinesVersion")
    implementation("org.jetbrains.kotlinx:kotlinx-coroutines-android:$coroutinesVersion")

    // ViewModel, LiveData
    val lifecycleVersion = "2.5.1"
    implementation("androidx.lifecycle:lifecycle-livedata-ktx:$lifecycleVersion")
}
서버로부터 데이터를 받는 작업을 백그라운드 스레드에서 진행할 것이므로, 코루틴 라이브러리를 추가한다. 그리고 받아온 데이터를 비동기적으로 표시하기 위한 ViewModel 및 LiveData 라이브러리도 추가한다.
마지막으로, 안드로이드 스튜디오 상단에 뜨는 'Sync Now' 버튼을 클릭한다.
#4 Data Class 만들기
#4-1 AlbumsItem.kt
package com.example.retrofitbasics


import com.google.gson.annotations.SerializedName

data class AlbumsItem(
    @SerializedName("userId")
    val userId: Int,

    @SerializedName("id")
    val id: Int,

    @SerializedName("title")
    val title: String,
)

/*
{
    "userId": 1,
    "id": 1,
    "title": "Album Title"
}

↑ 이 클래스는 위와 같은 JSON 데이터를, 아래와 같은 Kotlin 객체로 바꾼다. ↓

val myAlbum = AlbumsItem(id = 1, title = "Album Title", userId = 1)
*/
GSON 라이브러리의 어노테이션인 @SerializedName()을 활용해, GSON 라이브러리가 서버가 보내준 JSON을 파싱할 때 참조할 Key 정보를 넣는다.
#4-2 Albums.kt
// package com.example.retrofitbasics


class Albums : ArrayList<AlbumsItem>()
AlbumsItem를 ArrayList에 넣은 객체다. 이렇게 굳이 나누는 이유는, 서버로부터 받아올 JSON 아이템 하나에 @SerializedName()가 쓰인 #4-1의 data class 하나가 매칭되게 만드는 것, 즉 JSON 객체 하나와 코틀린 객체가 1대1로 매칭되게 만드는 것이 직관적이기 때문이다. #4-1과 #4-2를 하나로 합치면 오히려 복잡해질 것이다. 하여튼 앞으로 Albums 클래스는 이후로 AlbumsItem을 하나하나 담는 그릇으로 기능하게 될 것이다.
#4-3 (여담) kapt 라이브러리 없이 어노테이션(@)이 존재하는 이유
어노테이션(@)을 처리하는 라이브러리인 kapt를 build.gradle의 dependencies { ... }에 추가하지 않았음에도 #4-1의 코드가 에러없이 컴파일이 되는 이유가 뭘까?
kapt는 어노테이션을 그저 '읽게 해주는' 위한 라이브러리가 아니기 때문이다. kapt 라이브러리의 개입없이 소스 코드에 어노테이션(@)이 있다고 컴파일이 되지 않는 것이 아니다. kapt의 진짜 용도는, 컴파일 타임에 특정 코드를 생성하거나 검증하는 데에 있다. 예를 들어, Room에서 쓰이는 어노테이션들은, 컴파일 때에 Sqlite 데이터베이스와 관련된 코드를 암시적으로 생성하거나 Room의 구조가 제대로 지켜지는 지 확인하는 용도로 사용된다. 이 때 kapt가 그 과정을 수행하는 것이다.
반면, 위 코드의 어노테이션인 @SerializedName()은 컴파일 때 뭔갈 하지 않는다. 대신 런타임 시점에, @SerializedName()의 정보를 참고하여 JSON을 파싱에 활용한다.
#5 Service Interface 만들기
// package com.example.retrofitbasics

import retrofit2.Response
import retrofit2.http.GET
import retrofit2.http.Query


interface AlbumService {

    @GET("/albums")
    suspend fun getAlbums(): Response<Albums>

    @GET("/albums")
    suspend fun getSortedAlbums(@Query("userId") userId: Int): Response<Albums>
}
HTTP 메소드와 함께 다룰 자원의 위치(이 게시글의 #2-2 참조)를 메소드의 형태로 하나씩 기술한다. 이 함수를 백그라운드 스레드에서 실행시킬 것이므로 suspend 키워드를 붙인다. 반환형은 Response<>로, Retrofit은 항상 Response<>의 형태로 데이터를 반환한다. Query Parameter가 있는 경우 getSortedAlbums()와 같은 형식으로 메소드를 작성한다.
#6 Retrofit Instance 만들기
// package com.example.retrofitbasics

import com.google.gson.GsonBuilder
import retrofit2.Retrofit
import retrofit2.converter.gson.GsonConverterFactory

class RetrofitInstance {
    companion object {
        val BASE_URL = "https://jsonplaceholder.typicode.com/"
        fun getRetrofitInstance(): Retrofit {
            return Retrofit.Builder()
                .baseUrl(BASE_URL)
                .addConverterFactory(GsonConverterFactory.create(GsonBuilder().create()))
                .build()
        }

    }
}
Retrofit의 인스턴스는 Retrofit.Builder()라는 빌더 클래스를 통해 생성된다. Service Interface에서 기술했던 '다룰 자원의 위치'에 대해 그 기반이 되는 기본 URL과 서버로부터 받은 JSON 등의 파일 형식을 코틀린 객체로 바꿔주는 Converter를 Retrofit.Builder()에 달아준 다음 인스턴스를 생성한다.
#7 Service Class 만들기
// package com.example.retrofitbasics

...

class MainActivity : AppCompatActivity() {
    override fun onCreate(savedInstanceState: Bundle?) {
        ...

        val retrofitService = RetrofitInstance.getRetrofitInstance().create(AlbumService::class.java)
    }
}#6에서 생성된 Retrofit의 인스턴스에서 Service Interface를 매개변수로 받는 Retrofit.create() 메소드를 수행한다. 이를 통해 Service Interface의 구현체(Service Class)를 만든다. 그리고 이 구현체의 메소드들(= Service Interface에서 정의했던 메소드들)로 서버와 통신할 것이다.
#8 서버로부터 받아온 데이터 화면에 표시하기
#8-1 activity_main.xml
<?xml version="1.0" encoding="utf-8"?>
<androidx.constraintlayout.widget.ConstraintLayout xmlns:android="http://schemas.android.com/apk/res/android"
    xmlns:app="http://schemas.android.com/apk/res-auto"
    xmlns:tools="http://schemas.android.com/tools"
    android:layout_width="match_parent"
    android:layout_height="match_parent"
    tools:context=".MainActivity">

    <ScrollView
        android:id="@+id/scrollView"
        android:layout_width="match_parent"
        android:layout_height="match_parent"
        app:layout_constraintBottom_toBottomOf="parent"
        app:layout_constraintEnd_toEndOf="parent"
        app:layout_constraintStart_toStartOf="parent"
        app:layout_constraintTop_toTopOf="parent"
        app:layout_constraintVertical_bias="1.0">

        <TextView
            android:id="@+id/textView"
            android:layout_width="match_parent"
            android:layout_height="wrap_content"
            android:text=""
            android:textSize="30dp"
            app:layout_constraintBottom_toBottomOf="parent"
            app:layout_constraintEnd_toEndOf="parent"
            app:layout_constraintStart_toStartOf="parent"
            app:layout_constraintTop_toTopOf="parent" />
    </ScrollView>

</androidx.constraintlayout.widget.ConstraintLayout>
간단하게 구성한다. ScrollView 하나 그리고 그 안에 TextView 하나를 배치한다.
#8-2 MainAcitivity.kt
...
class MainActivity : AppCompatActivity() {
override fun onCreate(savedInstanceState: Bundle?) {
super.onCreate(savedInstanceState)
setContentView(R.layout.activity_main)
val retrofitService =
RetrofitInstance.getRetrofitInstance().create(AlbumService::class.java)
val textView = findViewById<TextView>(R.id.textView)
val responseLiveData: LiveData<Response<Albums>> = liveData {
val response1 = retrofitService.getAlbums()
val response2 = retrofitService.getSortedAlbums(7)
emit(response1)
}
responseLiveData.observe(this, Observer {
appendListOnTextView(textView, it)
})
}
private fun appendListOnTextView(textView: TextView, list: Response<Albums>) {
val albumsList = list.body()?.listIterator()
if (albumsList != null) {
while (albumsList.hasNext()) {
val albumsItem = albumsList.next()
val result =
"User id : ${albumsItem.userId}" + "\n" +
"Album id : ${albumsItem.id}" + "\n" +
"Album Title : ${albumsItem.title}" + "\n\n\n"
textView.append(result)
}
}
}
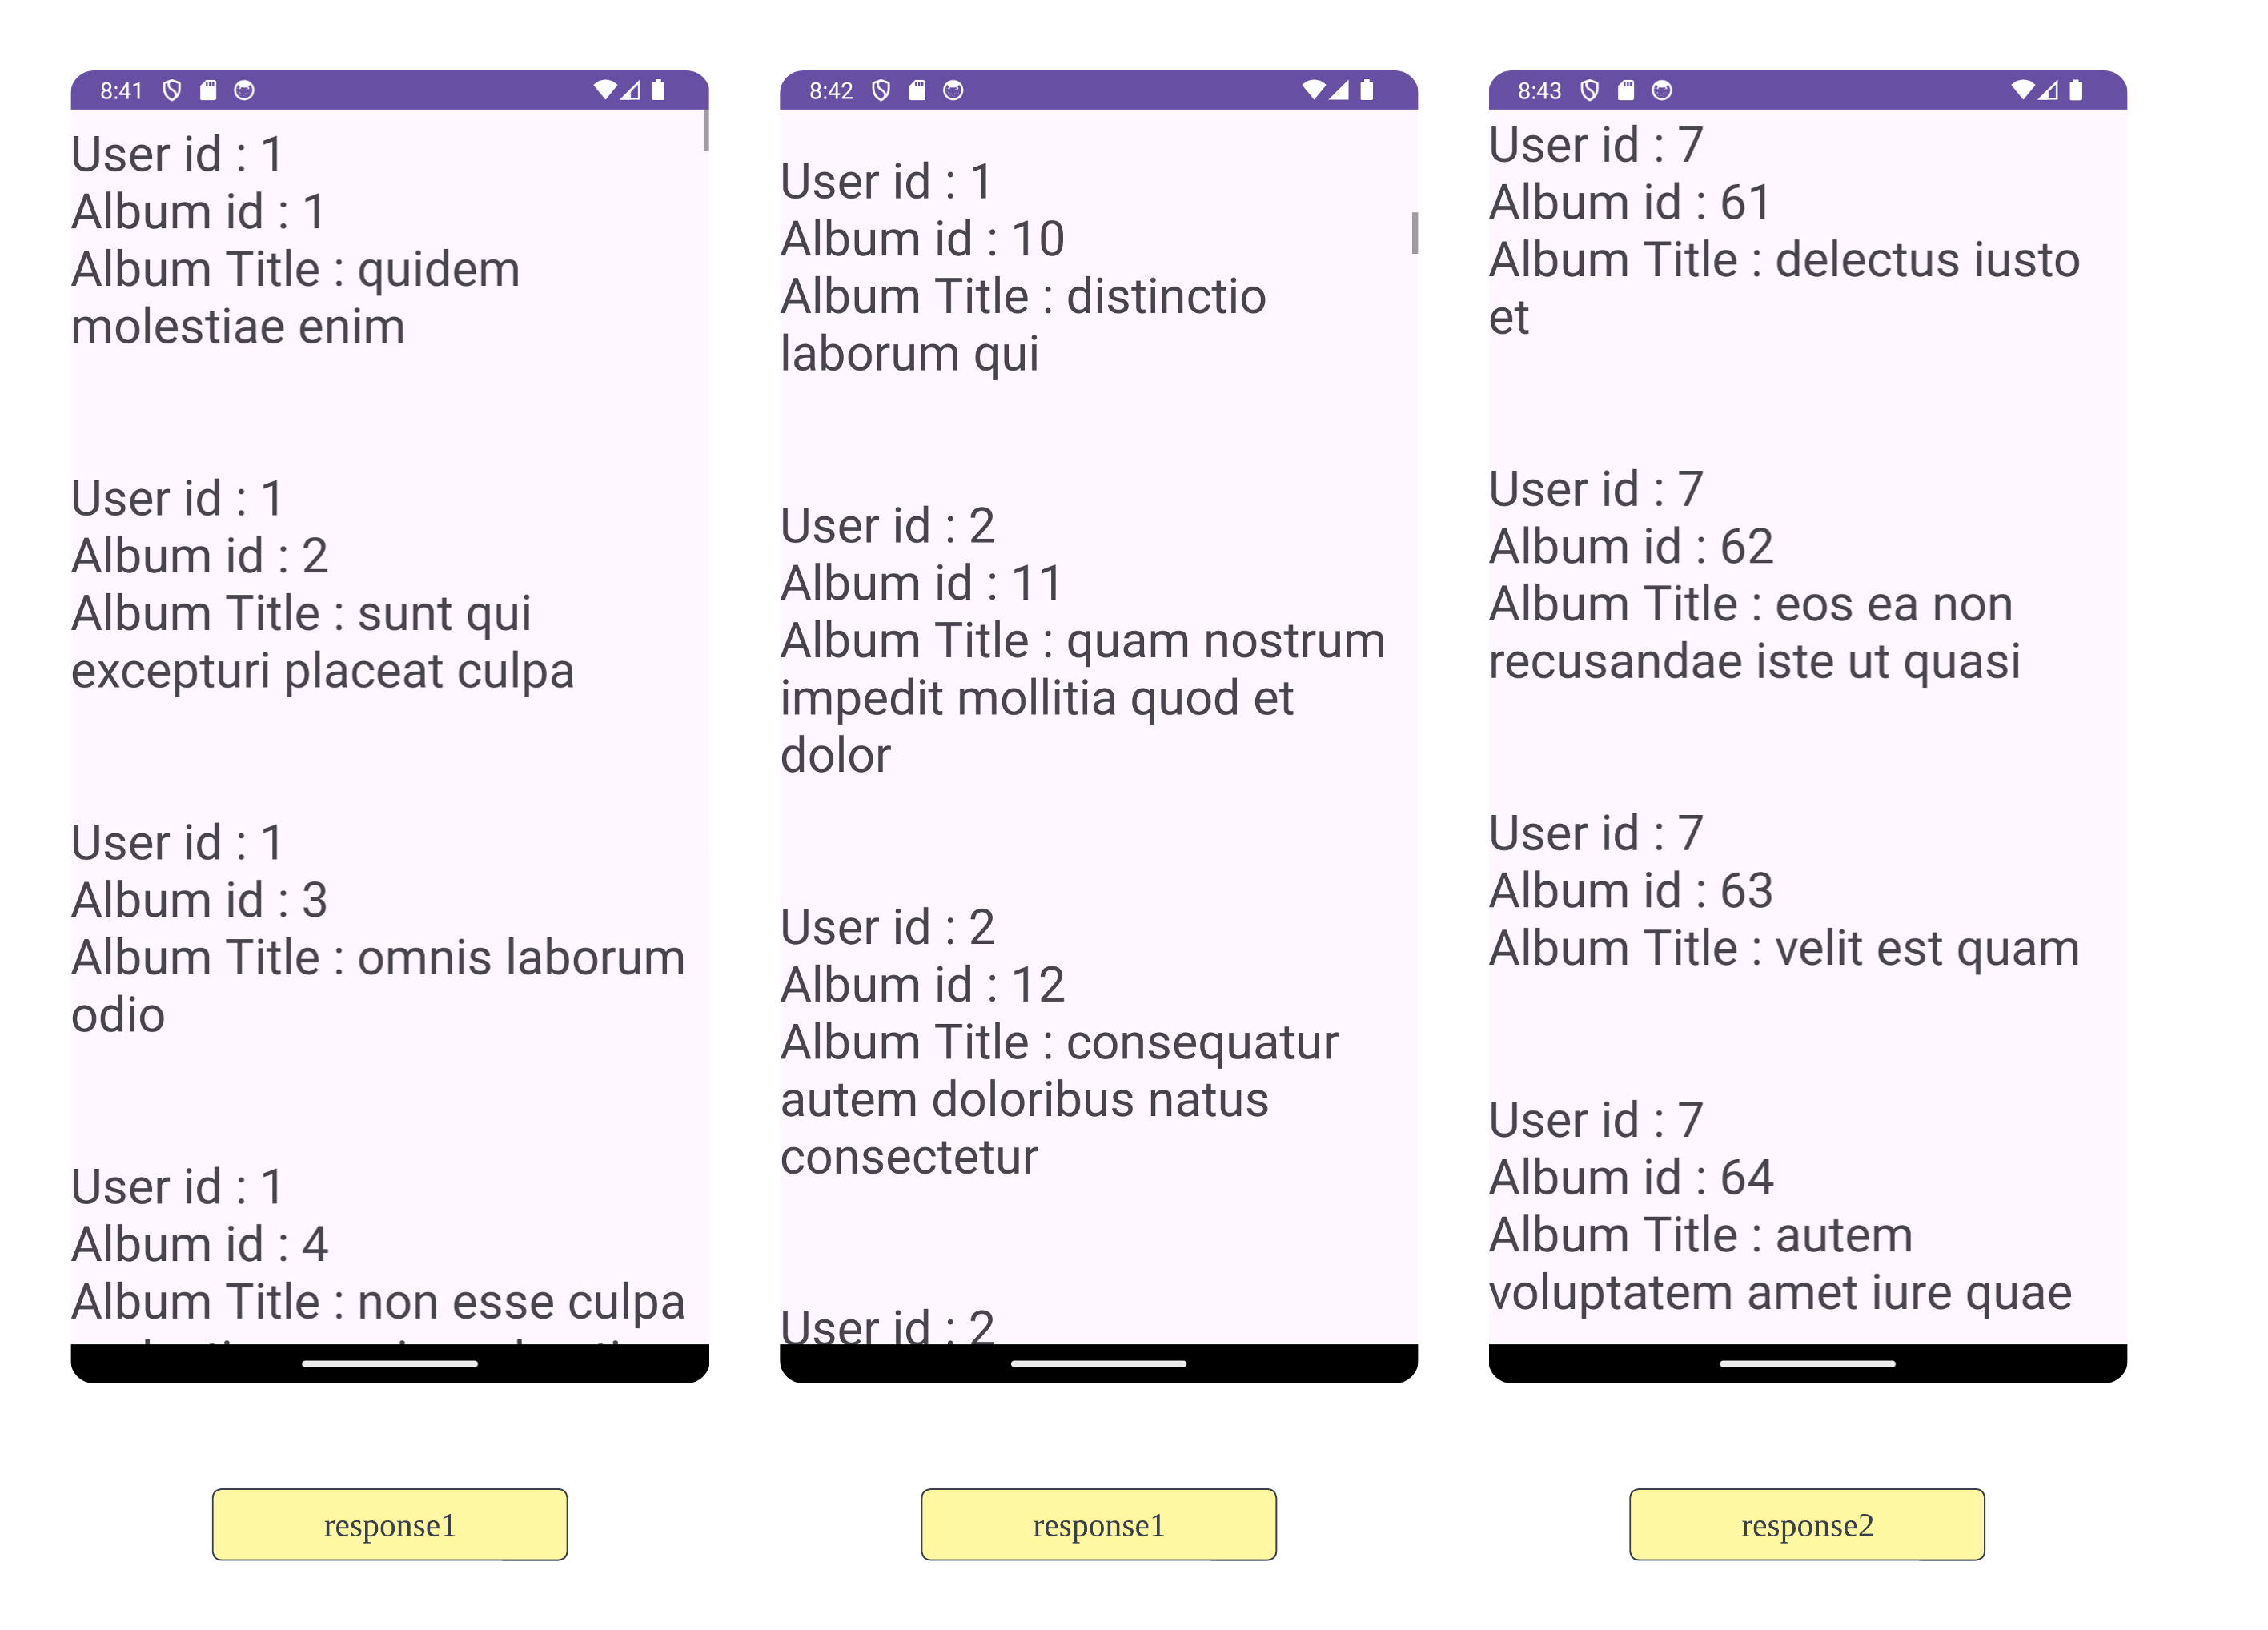
}서버로부터 받은 데이터 Response<Albums>을 LiveData로 선언한다. LiveData Builder도 사용했다. 해당 LiveData의 데이터가 들어가거나 변화할 때마다 발생하는 작업을 기술하기 위한 LiveData.observe() 메소드도 정의한다. response1은 모든 데이터를, response2는 userId가 7인 데이터를 가져온다. 여기서는 이렇게 userId를 하드 코딩했지만, 이어지는 글(#12 참조)에서는 사용자가 원하는 userId를 요청하고 그에 응답할 수 있게 만들어본다.
#9 작동 확인
#10 요약
Retrofit은 클라이언트-서버 간 통신을 간편하며 유연히 구현하는 도구다.
#11 완성된 앱
android-practice/retrofit/RetrofitBasics at master · Kanmanemone/android-practice
Contribute to Kanmanemone/android-practice development by creating an account on GitHub.
github.com
#12 이어지는 글
#12-1 userId 소프트 코딩 및 프로젝트를 MVVM 구조로 구현
[Android] Retrofit - MVVM 구조
#1 이전 글 [Android] Retrofit - 기초#1 이전 글 [Android] Retrofit - 배경과 구조#1 Restrofit의 배경#1-1 REST API REST API (REpresentational State Transfer Application Programming Interface)#1 무엇(What)에 대한 API인가?#1-1 개요REST(
kenel.tistory.com
이어지는 글에서 userId를 하드 코딩하는 대신, 사용자의 입력에 따라 변할 수 있도록 만든다. 또, 하는 김에 MVVM적인 구조로 만들어본다.
#12-2 Logging과 Timeout 설정
[Android] Retrofit - Logging, Timeout 관리 (Interceptor)
#1 이전 글 [Android] Retrofit - 기초#1 이전 글 [Android] Retrofit - 배경과 구조#1 Restrofit의 배경#1-1 REST API REST API (REpresentational State Transfer Application Programming Interface)#1 무엇(What)에 대한 API인가?#1-1 개요RE
kenel.tistory.com
Retrofit Instance가 통신 기록(Log)을 남기게 만든다. 또, Retrofit Instance가 서버-클라이언트 간 통신을 성공 또는 실패(Timeout)로 판단하는 규칙을 바꿔본다.
#12-3 Post 요청 구현
[Android] Retrofit - Post
#1 이전 글 [Android] Retrofit - 기초#1 이전 글 [Android] Retrofit - 배경과 구조#1 Restrofit의 배경#1-1 REST API REST API (REpresentational State Transfer Application Programming Interface)#1 무엇(What)에 대한 API인가?#1-1 개요RE
kenel.tistory.com
서버에 Post 요청을 해본다. (참조: REST API)
'깨알 개념 📑 > Android' 카테고리의 다른 글
| [Android] Retrofit - Logging, Timeout 관리 (Interceptor) (0) | 2024.06.11 |
|---|---|
| [Android] Retrofit - MVVM 구조 (0) | 2024.06.05 |
| [Android] Retrofit - 배경과 구조 (0) | 2024.05.28 |
| [Android] Room - AutoMigrationSpec (0) | 2024.05.08 |
| [Android] Room - AutoMigration 기초 (0) | 2024.05.06 |