#1 Hilt 개요
Hilt를 사용한 종속 항목 삽입 | Android Developers
이 페이지는 Cloud Translation API를 통해 번역되었습니다. Hilt를 사용한 종속 항목 삽입 컬렉션을 사용해 정리하기 내 환경설정을 기준으로 콘텐츠를 저장하고 분류하세요. Hilt는 프로젝트에서 종속
developer.android.com
Hilt는 Dagger2의 복잡한 부분을 더 쉽고 효율적으로 사용할 수 있게 만들어주는 추상화 계층이다. 그런 면에서 Dagger2 - Hilt 관계는 SQLite - Room의 관계와도 같다. Hilt을 사용하면 Dagger2를 생으로 사용하는 것보다 세세한 설정은 불가능하다. 하지만, 상용구 코드를 많이 줄여준다. 말 그대로 추상화 계층이니 말이다.
#2 Hilt 사용하기 - 기초
#2-1 Hilt를 적용할 샘플 앱
[Android] Dagger2 - Activity에 Dependency 주입
#1 이전 글 [Android] Dagger2 - 기초#1 이전 글 의존성 주입 (Dependency Injection)#1 의존성 주입(Dependency Injection)이란?#1-1 Dependent와 Dependencyfun main() { val car = Car() car.startCar() } class Car { private val engine = Engine
kenel.tistory.com
Dagger2를 이용해 필드 주입을 구현한 위 게시글의 완성된 앱을 일부 수정해서, 해당 앱이 Dagger2 대신 Hilt를 이용해 의존성 주입을 하게 만들어본다.
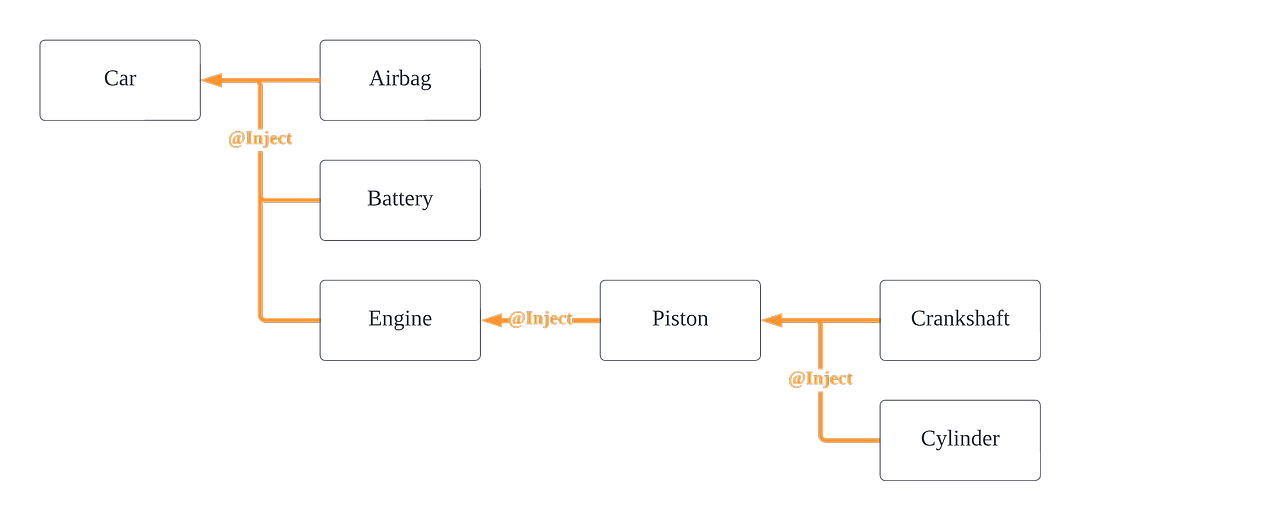
수정을 가할 샘플 앱의 의존성 그래프다.
#2-2 build.gradle (프로젝트 수준)
// Top-level build file where you can add configuration options common to all sub-projects/modules.
plugins {
    ...

    // Hilt
    id("com.google.dagger.hilt.android") version "2.46" apply false
}
#2-3 build.gradle (모듈 수준)
plugins {
    ...

    // Hilt
    id("com.google.dagger.hilt.android")
}

android {
    ...
}

dependencies {

    ...
/*
    // Dagger2
    val daggerVersion = "2.51.1"
    implementation("com.google.dagger:dagger:$daggerVersion")
    kapt("com.google.dagger:dagger-compiler:$daggerVersion")
*/
    // Hilt
    val hiltVersion = "2.46"
    implementation("com.google.dagger:hilt-android:$hiltVersion")
    kapt("com.google.dagger:hilt-android-compiler:$hiltVersion")
}
기존 Dagger2에 관한 라이브러리는 주석 처리를 통해 삭제해버렸다. Hilt 라이브러리에 이미 포함되어있기 때문이다.
#2-4 사용자 정의 @Component 클래스 (CarComponent.kt) 삭제
/* 삭제

import dagger.Component

@Component
interface CarComponent {
    fun inject(mainActivity: MainActivity)
}

*/
Hilt가 Dagger2와 구별되는 가장 큰 부분은 바로 @Component 클래스의 인스턴스를 프로그래머가 만들도록 허용하지 않는다는 점이다. Hilt에서는 여러 가지 Component 인스턴스가 라이브러리 단에서 이미 생성된 채로 프로그래머에게 제공된다. 프로그래머는 그 중에서 필요한 컴포넌트를 골라서 사용하는 구조다 (참조: Hilt에 built-in된 컴포넌트의 목록). 따라서 CarComponent.kt 파일을 안드로이드 프로젝트에서 제거한다.
#2-5 Application 클래스에 @HiltAndroidApp 어노테이션 붙이기
// package com.example.migrationtohilt

import android.app.Application
import dagger.hilt.android.HiltAndroidApp

// AndroidManifest.xml에서 android:name=".MyApplication" 추가하는 것 잊지 말기!
@HiltAndroidApp
class MyApplication : Application()
이 @HiltAndroidApp 어노테이션은 Hilt의 암시적 코드 생성을 개시(trigger)하게 만든다.
#2-6 AndroidManifest 수정
<?xml version="1.0" encoding="utf-8"?>
<manifest xmlns:android="http://schemas.android.com/apk/res/android"
    xmlns:tools="http://schemas.android.com/tools">

    <application
        android:name=".MyApplication"
        ...>
        <activity
            ...
        </activity>
    </application>

</manifest>
안드로이드 프로젝트가 기본 Application 클래스 대신 이 Application 클래스를 사용하도록 명시한다. AndroidManifest의 <application> 태그의 android:name 속성에 방금 만든 Application 클래스의 이름을 넣자.
#2-7 안드로이드 클래스에 @AndroidEntryPoint 어노테이션 붙이기
// package com.example.migrationtohilt

import android.os.Bundle
import androidx.appcompat.app.AppCompatActivity
import dagger.hilt.android.AndroidEntryPoint
import javax.inject.Inject

@AndroidEntryPoint
class MainActivity : AppCompatActivity() {

    @Inject
    lateinit var car: Car

    override fun onCreate(savedState: Bundle?) {
        super.onCreate(savedState)
        setContentView(R.layout.activity_main)
/*
        val crankshaft = Crankshaft()
        val cylinder = Cylinder()
        val piston = Piston(crankshaft, cylinder)
        val engine = Engine(piston)
        val airbag = Airbag()
        val battery = Battery()

        val car = Car(engine, airbag, battery)
*/

//      DaggerCarComponent.create().inject(this)

        car.startCar()
    }
}
의존성을 주입받을 안드로이드 클래스에, 이 프로젝트의 경우에는 MainActivity에 @AndroidEntryPoint 어노테이션을 붙이다. 이 어노테이션은 Hilt로부터 의존성을 주입받을 클래스를 명시하는 역할을 수행한다. 또, 이 어노테이션은 재귀적으로 붙여야한다. 예를 들어, 어떤 Fragment에 @AndroidEntryPoint로 의존성을 주입하려면, 해당 Fragment를 사용하는 모든 Activity에도 @AndroidEntryPoint 어노테이션의 부착이 요구된다. DaggerCarComponent.create().inject(this)도 삭제한다. 이 부분은 Hilt에서 암시적으로 진행하기 때문이다. 즉, @Inject가 붙은 필드(코틀린이니까 더 정확히 말하면 프로퍼티)에 Hilt가 알아서 인스턴스를 할당한다.
#2-8 작동 확인 (로그 메시지)
Crankshaft is ready
Cylinder is ready
Piston is ready
Engine is ready
Airbag is ready
Battery is ready
Car is ready
#3 Hilt 사용하기 - @Module과 @Provides
#3-1 개요
[Android] Dagger2 - @Provides
#1 이전 글 [Android] Dagger2 - 기초#1 이전 글 의존성 주입 (Dependency Injection)#1 의존성 주입(Dependency Injection)이란?#1-1 Dependent와 Dependencyfun main() { val car = Car() car.startCar() } class Car { private val engine = Engine
kenel.tistory.com
위 게시글처럼, Hilt에서 @Module 및 @Provides를 사용해본다. 위 게시글에서 나오듯, @Provides를 사용하는 경우는 의존성인 클래스를 건들 수 없는 경우다. Airbag 및 Battery가 String형 의존성을 요구하게 만들어본다. 그냥 위 게시글의 내용을 Hilt로 똑같이 재현한다고 보면 된다.
#3-2 Airbag 클래스 수정
// package com.example.migrationtohilt

import android.util.Log
import javax.inject.Inject
import javax.inject.Named

class Airbag @Inject constructor(@Named("Airbag") private val manufacturer: String) {
    fun startAirbag() {
        Log.i("interfacer_han", "${this::class.simpleName} is ready")
        Log.i("interfacer_han", "${this::class.simpleName} made by ${manufacturer}")
    }
}
#3-3 Battery 클래스 수정
// package com.example.migrationtohilt

import android.util.Log
import javax.inject.Inject
import javax.inject.Named

class Battery @Inject constructor(@Named("Battery") private val manufacturer: String) {
    fun startBattery() {
        Log.i("interfacer_han", "${this::class.simpleName} is ready")
        Log.i("interfacer_han", "${this::class.simpleName} made by ${manufacturer}")
    }
}
#3-4 Module 생성 및 @InstallIn 어노테이션을 통한 컴포넌트 지정
// package com.example.migrationtohilt

import dagger.Module
import dagger.Provides
import dagger.hilt.InstallIn
import dagger.hilt.components.SingletonComponent
import javax.inject.Named

@Module
@InstallIn(SingletonComponent::class)
class MyModule {

    @Provides
    @Named("Airbag")
    fun providesAirbagManufacturer(): String {
        return "KENEL"
    }

    @Provides
    @Named("Battery")
    fun providesBatteryManufacturer(): String {
        return "TISTORY"
    }
}
코드는 Dagger에서와 거의 같으나, @InstallIn이라는 어노테이션의 유무라는 차이점이 존재한다. #2-4에서 말했듯, Hilt는 컴포넌트를 '만드는' 것이 아니라, '선택하는' 것이므로 @Component 어노테이션이 없다. 이 때 원래의 @Component에 대응되는 것은 @InstallIn라고 할 수 있는데, @InstallIn은 해당 Module이 어떤 (Hilt에 built-in된) 컴포넌트에 설치(Install)될 지 지정하는 어노테이션이기 때문이다. Dagger2에서는 @Component 어노테이션에 어떤 모듈을 쓸 지 명시했는데, Hilt에서는 반대로 @Module에서 어떤 Component에 설치될 지 명시하고 있다는 점이 대비된다.
(2025-02-01 추가) @Module은 class가 아니라 object로 선언하는 것이 좋다. Hilt 라이브러리는 @Module을 단일 객체(싱글톤)로 사용하기 때문이다. 즉, 여러번 인스턴스화 될 것을 상정하는 키워드인 class를 쓸 이유가 없다. 물론 위의 코드처럼, object 자리에 대신 class를 둬도 딱히 에러가 발생하진 않는다.
#3-5 업데이트된 의존성 그래프

Airbag 및 Battery 클래스에서 String형 의존성을 추가하고, Module로 해당 String형 의존성을 @Provides함으로써 업데이트된 의존성 그래프다.
#3-6 작동 확인 (로그 메시지)
Crankshaft is ready
Cylinder is ready
Piston is ready
Engine is ready
Airbag is ready
Airbag made by KENEL
Battery is ready
Battery made by TISTORY
Car is ready
#4 Hilt 사용하기 - 매개변수 동적 할당
#4-1 개요 (@AssistedInject와 @AssistedFactory의 사용 배경)
앞서 말했듯, Hilt가 Dagger2와 구별되는 가장 큰 부분은 바로 @Component 클래스의 인스턴스를 프로그래머가 만들지 않으며, Component 인스턴스가 라이브러리 단에서 이미 생성된 채로 프로그래머에게 제공된다. 따라서 이전 게시글에서처럼 Componenet.Builder를 통해 @Module 클래스 및 @Provides 메소드에 동적 매개변수를 전달하는 것이 불가능하다.
그래서 Hilt에서는 동적 매개변수를 전달하기 위한 의도로, 대신 @AssistedInject 및 @AssistedFactory 어노테이션을 사용한다. @AssistedFactory 어노테이션의 이름에서 보듯, Factory 패턴을 구현해서 Component.Builder에서 했던 것과 비슷한 맥락으로 객체를 생성할 것이다.
#4-2 @AssistedInject 및 @AssistedFactory 어노테이션 붙이기
// package com.example.migrationtohilt

import android.util.Log
import dagger.assisted.Assisted
import dagger.assisted.AssistedFactory
import dagger.assisted.AssistedInject

class Car @AssistedInject constructor(
    @Assisted private val engine: Engine,
    private val airbag: Airbag,
    private val battery: Battery
) {
    fun startCar() {
        engine.startEngine()
        airbag.startAirbag()
        battery.startBattery()
        Log.i("interfacer_han", "${this::class.simpleName} is ready")
    }

    @AssistedFactory
    fun interface Factory {
        fun create(engine: Engine): Car
    }
}
피치못할 사정으로, Car 클래스의 의존성 중 하나인 Engine 클래스를 반드시 런타임 중에 동적으로 할당해야되는 상황이 생겼다고 가정한다. 이렇게 의존성들 중 하나라도 동적 할당이 요구되면 생성자에 붙은 @Inject 어노테이션을 통째로 @AssistedInject로 바꿔야 한다. 여기에, 동적 할당이 요구되는 의존성에는 @Assisted 어노테이션을 추가로 붙인다. 그리고 클래스 내부에 Hilt가 Factory 패턴 코드를 생성하도록 @AsssistedFactory 어노테이션이 붙은 SAM 하나를 추가한다. interface 키워드 왼쪽의 fun을 삭제하고 평범한 interface(SAM의 후보)로 둬도 큰 상관은 없다. 어느 쪽이든 프로젝트 빌드는 잘 된다.
#4-3 업데이트된 의존성 그래프
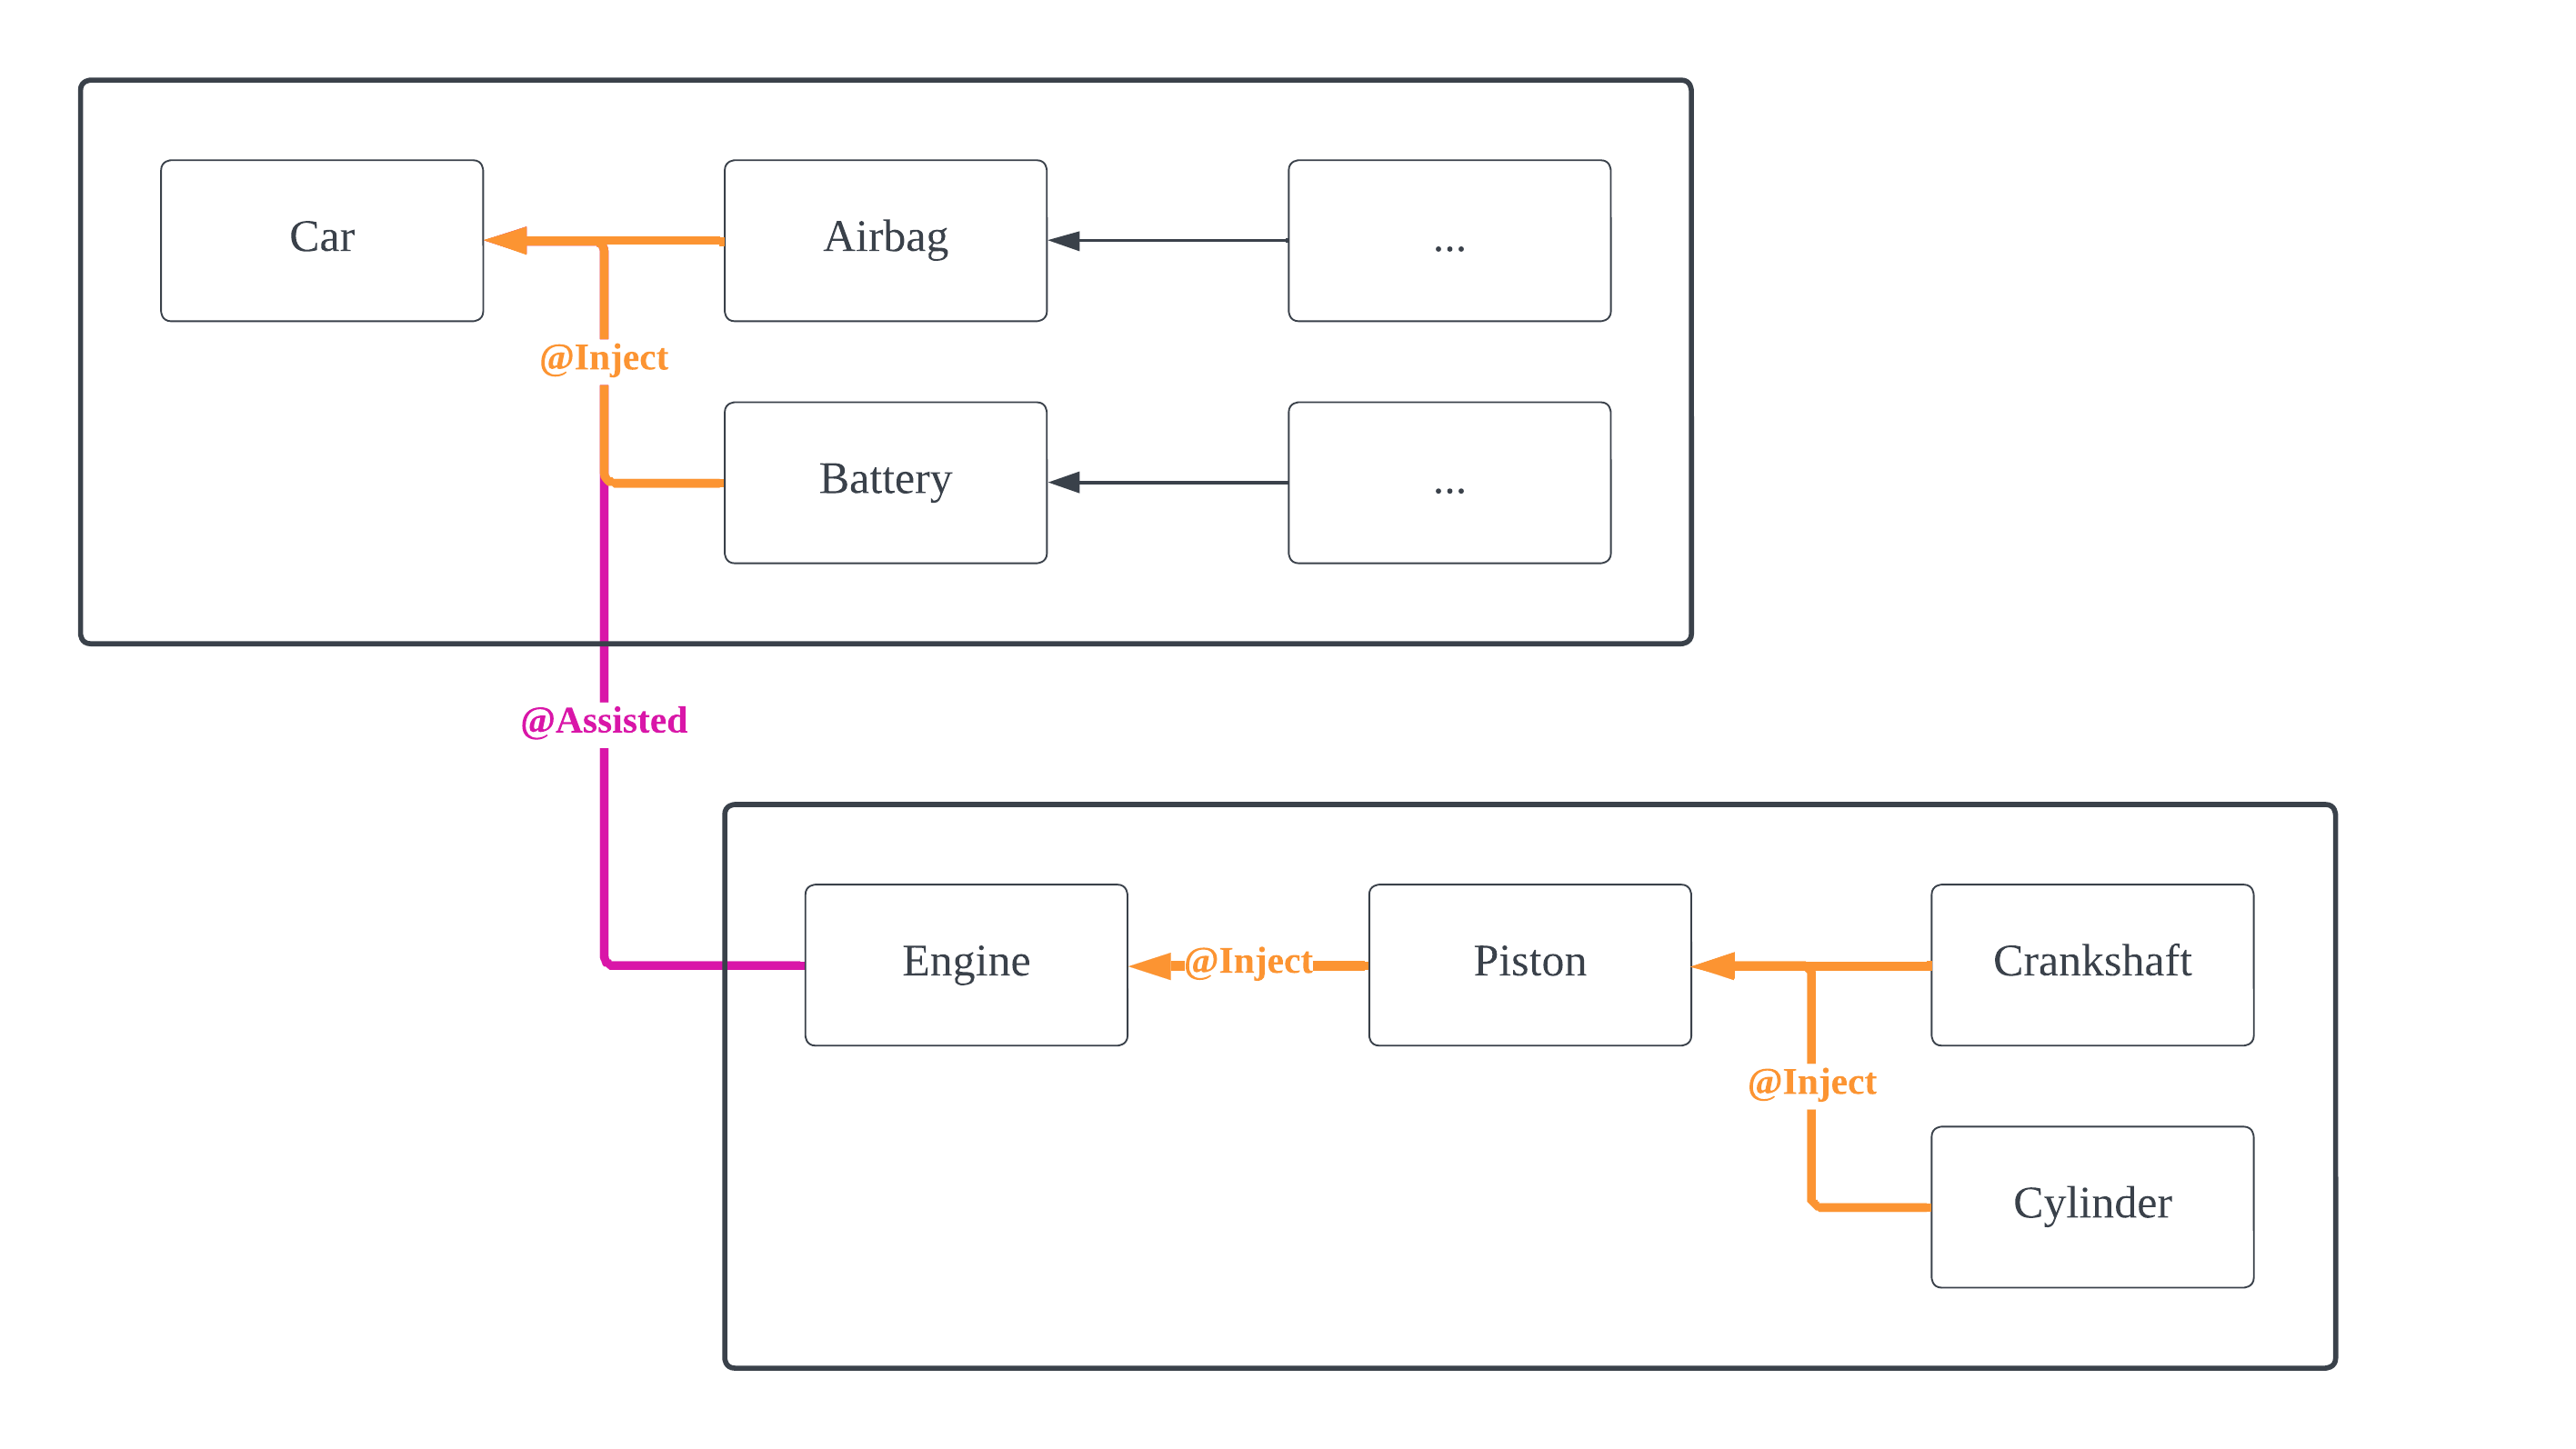
#4-2의 코드 수정으로 인해 업데이트된 의존성 그래프다. @AssistedInject는 Hilt가 그려내는 의존성 그래프를 분리시킨다. 즉, Car와 Engine은 서로 다른 2개의 그래프에 속하게 되는 것이다. 이 도식도를 그리니, @Assisted의 의미가 제대로 보인다. 바로 프로그래머가 도와주어야(Assist)하는 의존성 주입이라는 의미 말이다.
#4-4 MainActivity 수정
// package com.example.migrationtohilt

import android.os.Bundle
import androidx.appcompat.app.AppCompatActivity
import dagger.hilt.android.AndroidEntryPoint
import javax.inject.Inject

@AndroidEntryPoint
class MainActivity : AppCompatActivity() {

    lateinit var car: Car

    @Inject
    lateinit var carFactory: Car.Factory

    @Inject
    lateinit var engine: Engine

    override fun onCreate(savedState: Bundle?) {
        super.onCreate(savedState)
        setContentView(R.layout.activity_main)

        car = carFactory.create(engine) // 런타임 때 Engine 객체 주입
        car.startCar()
    }
}
Car 클래스 대신 Car.Factory 클래스를 Hilt로부터 주입받는다. 이 클래스는 방금 Car 속에 정의했던 interface를 Hilt가 알아서 클래스로서 구현해놓은 것이다. 이 클래스를 통해 매개변수의 런타임 중 동적 할당이 가능하다.
#4-5 작동 확인
Crankshaft is ready
Cylinder is ready
Piston is ready
Engine is ready
Airbag is ready
Airbag made by KENEL
Battery is ready
Battery made by TISTORY
Car is ready
#3의 수정 사항도 같이 녹여냈기 때문에, "Airbag made by KENEL" 및 "Battery made by TISTORY"라는 로그 메시지도 보인다.
#5 Hilt 사용하기 - 인터페이스 구현체 주입
#5-1 개요
[Android] Dagger2 - 인터페이스 구현체 주입 (@Binds)
#1 이전 글 [Android] Dagger2 - 기초#1 이전 글 의존성 주입 (Dependency Injection)#1 의존성 주입(Dependency Injection)이란?#1-1 Dependent와 Dependencyfun main() { val car = Car() car.startCar() } class Car { private val engine = Engine
kenel.tistory.com
위 게시글처럼 Hilt에서도 @Provides 또는 @Binds 어노테이션을 통해 인터페이스 구현체를 주입할 수 있다. 달라지는 게 Component 처리를 위한 @InstallIn 어노테이션 외에는 없기 때문에, 설명 없이 코드 위주로 빠르게 넘긴다. 이 게시글에서는 Piston 클래스를 인터페이스로 전환하고 해당 인터페이스의 구현체를 주입하는 코드를 작성해본다.
#5-2 Piston 클래스를 인터페이스로 전환
// package com.example.migrationtohilt

interface Piston {
    fun startPiston()
}
#5-3 Piston 인터페이스의 구현체 TitaniumPiston 클래스 생성
// package com.example.migrationtohilt

import android.util.Log
import javax.inject.Inject

class TitaniumPiston @Inject constructor(
    private val crankshaft: Crankshaft,
    private val cylinder: Cylinder
) : Piston {
    override fun startPiston() {
        crankshaft.startCrankshaft()
        cylinder.startCylinder()
        Log.i("interfacer_han", "${this::class.simpleName} is ready")
    }
}
#5-4 Piston의 구현체를 @Provides하거나 @Binds하기 위한 PistonModule
// package com.example.migrationtohilt

import dagger.Binds
import dagger.Module
import dagger.Provides
import dagger.hilt.InstallIn
import dagger.hilt.components.SingletonComponent

/*

// @Provides를 사용하는 경우
@Module
@InstallIn(SingletonComponent::class)
class PistonModule {

    @Provides
    fun providesTitaniumPiston(titaniumPiston: TitaniumPiston) : Piston {
        return titaniumPiston
    }
}

*/

// @Binds를 사용하는 경우
@Module
@InstallIn(SingletonComponent::class)
abstract class PistonModule {

    @Binds
    abstract fun providesTitaniumPiston(titaniumPiston: TitaniumPiston): Piston
}
일반 클래스 PistonModule과 @Provides의 조합을 사용하거나, 추상 클래스 PistonModule과 @Binds의 조합을 사용한다. 인터페이스 구현체의 주입은 후자의 방식이 일반적이다.
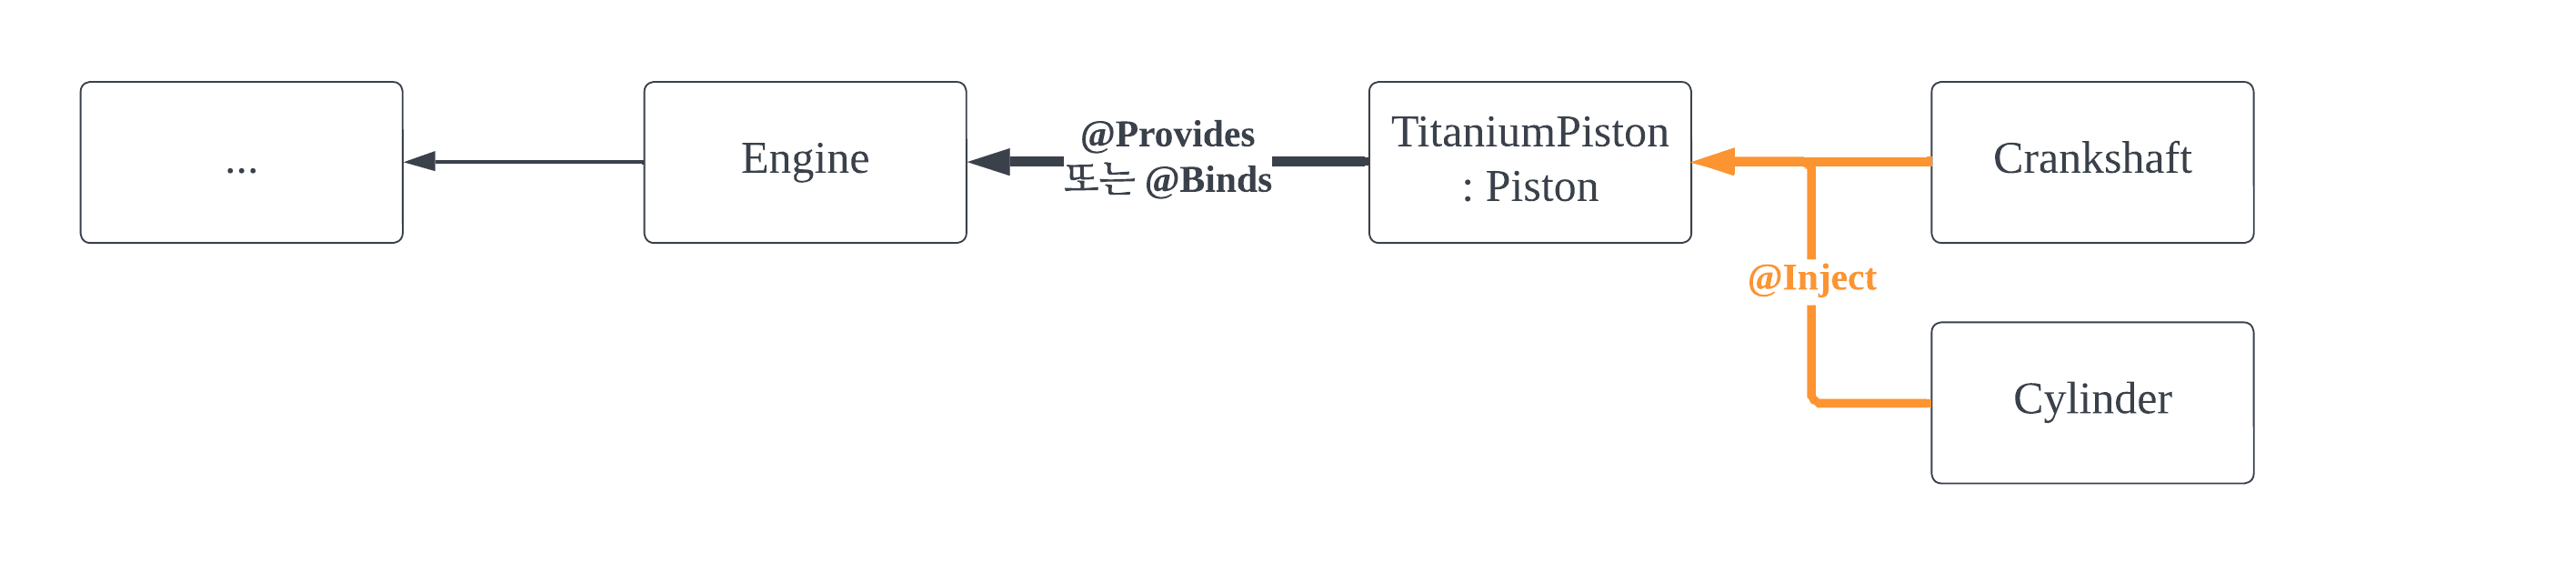
#5-5 업데이트된 의존성 그래프
#5-6 작동 확인 (로그 메시지)
Crankshaft is ready
Cylinder is ready
TitaniumPiston is ready
Engine is ready
Airbag is ready
Airbag made by KENEL
Battery is ready
Battery made by TISTORY
Car is ready
#3의 수정 사항도 같이 녹여냈기 때문에, "Airbag made by KENEL" 및 "Battery made by TISTORY"라는 로그 메시지도 보인다.
#6 요약
Hilt를 사용해서 얻는 이점은, 추상화 계층을 이용해서 얻는 이점과 동일하다.
#7 완성된 앱
#7-1 깃허브 링크
android-practice/dagger2/MigrationToHilt at master · Kanmanemone/android-practice
Contribute to Kanmanemone/android-practice development by creating an account on GitHub.
github.com
#2 ~ #5의 모든 수정사항을 전부 적용했다.
#7-2 의존성 그래프

#2 ~ #5 의 모든 수정사항이 전부 적용된 의존성 그래프다.
'깨알 개념 📑 > Android' 카테고리의 다른 글
| [Android] Jetpack Compose - Surface (0) | 2024.07.22 |
|---|---|
| [Android] Jetpack Compose - 기초 (0) | 2024.07.22 |
| [Android] Data Binding - View Binding (1) | 2024.07.10 |
| [Android] Unit Testing - Retrofit (0) | 2024.07.08 |
| [Android] Unit Testing - Room과 LiveData (1) | 2024.07.08 |