#1 Navigation
#1-1 액티비티 및 프래그먼트 구성의 트렌드
요즘 안드로이드 개발의 트렌드는 하나의 액티비티, 여러 개의 프래그먼트다. 이는 구글의 권장사항이기도 하다. 이 트렌드에서 단일 액티비티는 일종의 '빈 그릇'으로서만 의미를 가진다. 유의미한 화면 컨텐츠는 전부 프래그먼트로 구현하기 때문이다.
#1-2 Navigation architecture component library
탐색 | Android 개발자 | Android Developers
Android Jetpack의 탐색 구성요소를 사용하여 앱에서 탐색 구현
developer.android.com
그러나, 액티비티와 프래그먼트 간의 전환(Navigation)과 흐름을 일일이 구현하는 것은 골치아픈 일이다. 이 때, 안드로이드 Jetpack의 Navigation architecture component library는 Navigation의 손 쉬운 처리를 제공한다. 이 라이브러리에는 3개의 핵심 요소가 존재한다. 바로 Navigation graph, NavHostFragment, NavController다.
#1-3 Navigation graph
Navigation graph는 xml 파일의 형태이며, Navigation(프래그먼트 전환)과 관련된 모든 정보가 담긴 Resource File이다. 일반적으로 nav_graph.xml라는 이름으로 존재한다.
#1-4 NavHostFragment
프래그먼트는 액티비티에 담기는 것 뿐만 아니라 다른 프래그먼트를 품을 수도 있다. NavHostFragment는 다른 Fragment 품는, 말 그대로 Host하는 Fragment다. NavHostFragment가 제공하는 Host에 '손님'으로서 들어가는 프래그먼트들을 목적지(Destination) 프래그먼트라 부른다. 여기서 말하는 '목적지'는 Navigation의 도착지라는 의미다. 계층 구조를 보면, Activity에 NavHostFragment가 담기고, NavHostFragment에 Destination Fragment가 담긴다.
#1-5 NavController
NavController는 Navigation graph에서 추가했던 Destination Fragment들의 Navigation(전환)을 관리하는 객체다.
#2 Navigation 사용을 위한 준비
#2-1 데이터 바인딩이 구현된 샘플 앱
[Android] Data Binding - 기초
#1 데이터 바인딩 사용 전 #1-1 예시 앱 위과 같은 간단한 앱이 있다. Button을 누르면, EditText의 text가 바로 위에 있는 TextView의 text에 대입된다. 이 앱의 코드는 다음과 같다. #1-2 activity_main.xml #1-3 Main
kenel.tistory.com
어떤 앱을 만들든 앱의 잠재적인 결합도를 낮출 수 있다면 좋을 것이다. 따라서 위 게시글에 있는 방법대로 데이터 바인딩을 구현한다. Module 수준 build.gradle에서 데이터 바인딩을 허용하고, activity_main.xml을 <layout> 태그로 감싼다. MainActivity.kt에선 setContentView()를 DataBindingUtil을 통해 수행하고, 이를 ActivityMainBinding 클래스의 객체인 binding에 할당한다.
#2-2 build.gradle.kts (Module)에서 Navigation 라이브러리 다운로드
plugins {
    ...
}

android {
    ...
}

dependencies {
    val nav_version = "2.7.6"
    implementation("androidx.navigation:navigation-fragment-ktx:$nav_version") // Navigation
    implementation("androidx.navigation:navigation-ui-ktx:$nav_version") // Navigation

    ...
}
dependencies { ... }에 여기에 있는 구문을 추가한다.
#2-3 build.gradle.kts (Project)에서 Safe Args 플러그인 등록
// Top-level build file where you can add configuration options common to all sub-projects/modules.
plugins {
    id("com.android.application") version "8.1.2" apply false
    id("org.jetbrains.kotlin.android") version "1.9.0" apply false
}

buildscript {
    repositories {
        google() // 구글의 Maven repository에서 다운로드하기 위해서
    }
    dependencies {
        val nav_version = "2.7.6"
        classpath("androidx.navigation:navigation-safe-args-gradle-plugin:$nav_version")
    }
}
프래그먼트 간 데이터를 전달할 때 사용할 Safe Args 플러그인도 등록한다.
#2-4 Navagation graph 만들기

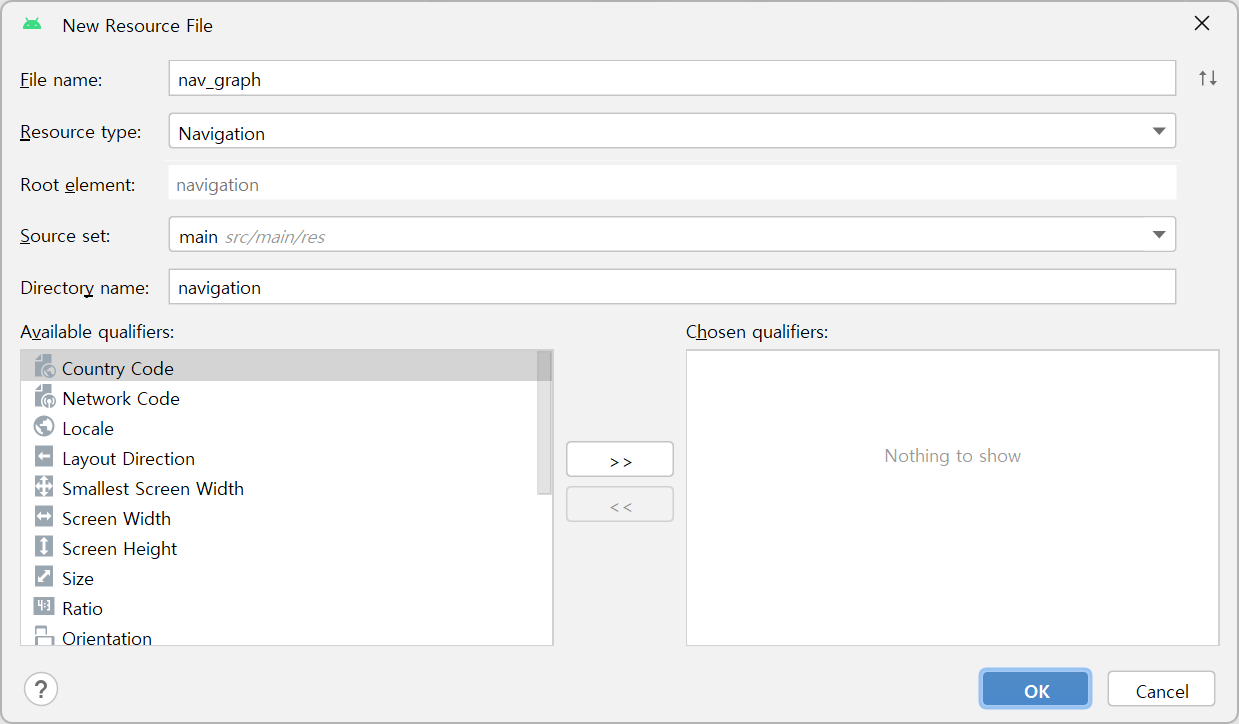
모듈의 이름(여기서는 "app")을 우클릭하면 나오는 메뉴에서 [New] - [Android Resource File]을 클릭한다.

이름에는 nav_graph를, Resource type은 Navigation으로 설정하고, OK 버튼을 누른다.
#2-5 activity_main.xml에서 NavHostFragment 만들기
<?xml version="1.0" encoding="utf-8"?>
<layout ...>

    <androidx.constraintlayout.widget.ConstraintLayout ...>


        <androidx.fragment.app.FragmentContainerView
            android:id="@+id/fragmentContainerView"
            android:layout_width="0dp"
            android:layout_height="0dp"
            android:layout_marginStart="1dp"
            android:layout_marginTop="1dp"
            android:layout_marginEnd="1dp"
            android:layout_marginBottom="1dp"
            app:layout_constraintBottom_toBottomOf="parent"
            app:layout_constraintEnd_toEndOf="parent"
            app:layout_constraintStart_toStartOf="parent"
            app:layout_constraintTop_toTopOf="parent" />
    </androidx.constraintlayout.widget.ConstraintLayout>
</layout>
activity_main.xml에 <androidx.fragment.app.FragmentContainerView>를 넣는다. 그리고 id와 layout 관련 속성에 프로그래머 마음대로 값을 할당한다.
<?xml version="1.0" encoding="utf-8"?>
<layout ...>

    <androidx.constraintlayout.widget.ConstraintLayout ...>


        <androidx.fragment.app.FragmentContainerView
            ...
            android:name="androidx.navigation.fragment.NavHostFragment"
            app:defaultNavHost="true"
            app:navGraph="@navigation/nav_graph" />
    </androidx.constraintlayout.widget.ConstraintLayout>
</layout>
그리고 NavHostFragment의 동작을 좌우할 3가지의 중요한 속성도 추가한다.
android:name 속성은 해당 <androidx.fragment.app.FragmentContainerView> 태그가 androidx.navigation.fragment.NavHostFragment 클래스를 참조하며, 이 클래스의 인스턴스로서 런타임 중에 생성될 것임을 의미한다.
app:defaultNavHost의 값이 true면, 해당 프래그먼트가 안드로이드 휴대폰의 '뒤로 가기' 버튼을 클릭했을 때 반응하는 Fragment라는 것을 의미한다. 한 개의 액티비티에 2개 이상의 프래그먼트 호스트가 존재할 수 있기 때문에 이런 속성이 있는 것이다.
마지막으로 app:navGraph 속성에는 해당 NavHostFragment가 사용할 Navigation graph를 할당한다. #2-4에서 만든 내비게이션 그래프를 넣으면 된다.
#3 요약
Navigation 라이브러리를 사용하기 위한 준비를 했다.
#4 완성된 앱
android-practice/navigation/SetupEnvironment at master · Kanmanemone/android-practice
Contribute to Kanmanemone/android-practice development by creating an account on GitHub.
github.com
#5 이어지는 글
[Android] Navigation - 기초
#1 이전 글 [Android] Navigation - 환경 설정 #1 Navigation#1-1 액티비티 및 프래그먼트 구성의 트렌드요즘 안드로이드 개발의 트렌드는 하나의 액티비티, 여러 개의 프래그먼트다. 이는 구글의 권장사항
kenel.tistory.com
'깨알 개념 📑 > Android' 카테고리의 다른 글
| [Android] Navigation - 애니메이션 (2) | 2024.01.27 |
|---|---|
| [Android] Navigation - 기초 (0) | 2024.01.26 |
| [Android] Fragment의 생명주기 (0) | 2024.01.24 |
| [Android] Activity의 생명주기 (0) | 2024.01.23 |
| [Android] MVVM 구조 한눈에 보기 (1) | 2024.01.22 |