#1 이전 글
[Android] Navigation - 환경 설정
#1 Navigation#1-1 액티비티 및 프래그먼트 구성의 트렌드요즘 안드로이드 개발의 트렌드는 하나의 액티비티, 여러 개의 프래그먼트다. 이는 구글의 권장사항이기도 하다. 이 트렌드에서 단일 액티
kenel.tistory.com
위 게시글에서 이어진다. 본 게시글에선 Navigation을 사용하는 샘플 앱을 만들어본다.
#2 Navigation 사용하기 - Destination 프래그먼트
#2-1 Navigation graph에 Destination 프래그먼트 등록하기

우리가 activity_main.xml을 다룰 때 Code 모드, Split 모드, Design 모드 중 하나를 선택해 편집하곤 했다. nav_graph.xml도 그렇다. nav_graph.xml을 Design 모드로 연다. 그리고 New Destination 버튼을 클릭한다.

Create new destination 클릭.

Fragment (Blank) 선택후 Next 버튼 클릭.

적절한 이름(여기서는 HomeFragment)을 지어주고 Finish 버튼 클릭.

Navigation graph에 Destination 프래그먼트가 등록됐다. 이와 동시에, res/layout 디렉토리에 fragment_home.xml이 자동 생성되었고, MainActivity.kt가 있는 디렉토리에는 HomeFragment.kt가 자동 생성되었다.
<?xml version="1.0" encoding="utf-8"?>
<navigation xmlns:android="http://schemas.android.com/apk/res/android"
    xmlns:app="http://schemas.android.com/apk/res-auto"
    xmlns:tools="http://schemas.android.com/tools"
    android:id="@+id/nav_graph"
    app:startDestination="@id/homeFragment">

    <fragment
        android:id="@+id/homeFragment"
        android:name="com.example.navigationbasics.HomeFragment"
        android:label="fragment_home"
        tools:layout="@layout/fragment_home" />
</navigation>
nav_graph.xml을 Code 모드로 보면 위와 같다.
#2-2 자동 생성된 fragment_home.xml 간단히 수정하기
<?xml version="1.0" encoding="utf-8"?>
<layout xmlns:android="http://schemas.android.com/apk/res/android"
    xmlns:app="http://schemas.android.com/apk/res-auto"
    xmlns:tools="http://schemas.android.com/tools">

    <androidx.constraintlayout.widget.ConstraintLayout
        android:layout_width="match_parent"
        android:layout_height="match_parent"
        tools:context=".HomeFragment">

        <EditText
            android:id="@+id/editText"
            android:layout_width="wrap_content"
            android:layout_height="wrap_content"
            android:ems="10"
            android:hint="이름을 입력해주세요."
            android:inputType="text"
            android:textSize="20sp"
            app:layout_constraintBottom_toBottomOf="parent"
            app:layout_constraintEnd_toStartOf="@+id/button"
            app:layout_constraintStart_toStartOf="parent"
            app:layout_constraintTop_toTopOf="parent" />

        <Button
            android:id="@+id/button"
            android:layout_width="wrap_content"
            android:layout_height="wrap_content"
            android:text="전송"
            android:textSize="20sp"
            app:layout_constraintBottom_toBottomOf="parent"
            app:layout_constraintEnd_toEndOf="parent"
            app:layout_constraintStart_toEndOf="@id/editText"
            app:layout_constraintTop_toTopOf="parent" />

    </androidx.constraintlayout.widget.ConstraintLayout>
</layout>
자동생성된 코드는 FrameLayout이다. 사용하기 편한 ConstraintLayout으로 바꿨다. 추가로, EditText와 Button도 넣었다. 마지막으로 데이터 바인딩을 위해 <layout> 태그로 감싸고 xmlns 속성을 최외곽 태그인 <layout>로 옮긴다.
#2-3 자동 생성된 HomeFragment.kt에 데이터 바인딩 적용하기
// package com.example.navigationbasics

import android.os.Bundle
import android.view.LayoutInflater
import android.view.View
import android.view.ViewGroup
import androidx.fragment.app.Fragment

// TODO: Rename parameter arguments, choose names that match
// the fragment initialization parameters, e.g. ARG_ITEM_NUMBER
private const val ARG_PARAM1 = "param1"
private const val ARG_PARAM2 = "param2"

/**
 * A simple [Fragment] subclass.
 * Use the [HomeFragment.newInstance] factory method to
 * create an instance of this fragment.
 */
class HomeFragment : Fragment() {
    // TODO: Rename and change types of parameters
    private var param1: String? = null
    private var param2: String? = null

    override fun onCreate(savedInstanceState: Bundle?) {
        super.onCreate(savedInstanceState)
        arguments?.let {
            param1 = it.getString(ARG_PARAM1)
            param2 = it.getString(ARG_PARAM2)
        }
    }

    override fun onCreateView(
        inflater: LayoutInflater, container: ViewGroup?,
        savedInstanceState: Bundle?
    ): View? {
        // Inflate the layout for this fragment
        return inflater.inflate(R.layout.fragment_home, container, false)
    }

    companion object {
        /**
         * Use this factory method to create a new instance of
         * this fragment using the provided parameters.
         *
         * @param param1 Parameter 1.
         * @param param2 Parameter 2.
         * @return A new instance of fragment HomeFragment.
         */
        // TODO: Rename and change types and number of parameters
        @JvmStatic
        fun newInstance(param1: String, param2: String) =
            HomeFragment().apply {
                arguments = Bundle().apply {
                    putString(ARG_PARAM1, param1)
                    putString(ARG_PARAM2, param2)
                }
            }
        /* interfacer_han: 바로 위에 있는 코드의 동작은 아래 있는 코드와 같다.
        @JvmStatic
        fun newInstance(param1: String, param2: String): HomeFragment {
            val fragment = HomeFragment()
            val bundle = Bundle()
            bundle.putString(ARG_PARAM1, param1)
            bundle.putString(ARG_PARAM2, param2)
            fragment.arguments = bundle
            return fragment
        }
        */
    }
}
코드 아랫 부분에 있는 내 주석을 제외하면 Navigation 라이브러리에 의해 자동 생성된 날 것 그대로의 Fragment 클래스 코드다. 이 코드를 아래와 같이 수정한다.
...

class HomeFragment : Fragment() {
    ...
    private lateinit var binding: FragmentHomeBinding

    override fun onCreateView(
        inflater: LayoutInflater, container: ViewGroup?,
        savedInstanceState: Bundle?
    ): View? {
        // Inflate the layout for this fragment
        binding = DataBindingUtil.inflate(inflater,R.layout.fragment_home, container, false)
        return binding.root
    }

    ...
}
#2-4 Destination 프래그먼트 하나 더 추가 (SecondFragment)
#2-1 ~ #2-3와 같은 방식으로 SecondFragment라는 이름의 Destination 프래그먼트를 추가한다. fragment_second.xml에는 <TextView> 위젯 딱 하나만 넣어둔다.
#3 Navigation 사용하기 - 프래그먼트 전환
#3-1 Action 만들기

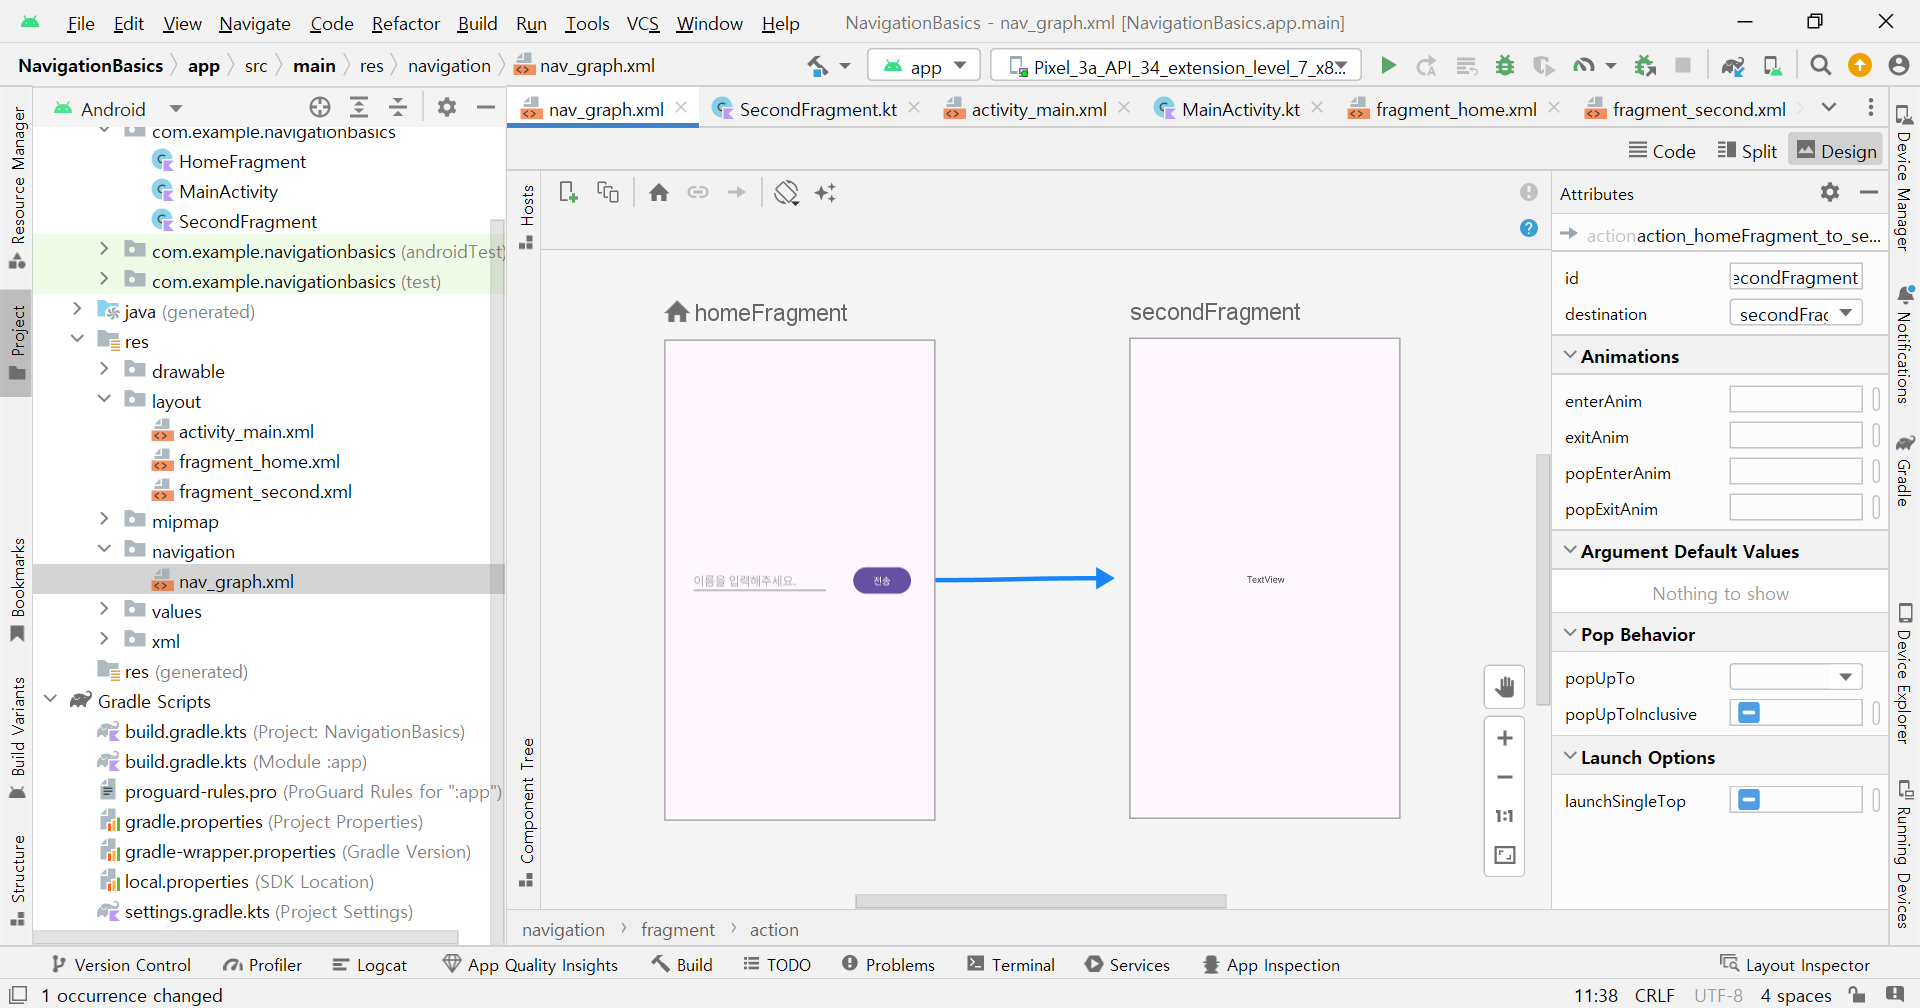
nav_graph.xml을 Design 모드로 연다. HomeFragment를 클릭하면 오른쪽에 파란색 원이 생긴다.

그 파란색 원을 드래그해서 SecondFragment에 연결한다. 이러면 두 프래그먼트 간의 Action이 생성된다. Action이란, 프래그먼트 전환의 흐름이다.
<?xml version="1.0" encoding="utf-8"?>
<navigation xmlns:android="http://schemas.android.com/apk/res/android"
    xmlns:app="http://schemas.android.com/apk/res-auto"
    xmlns:tools="http://schemas.android.com/tools"
    android:id="@+id/nav_graph"
    app:startDestination="@id/homeFragment">

    <fragment
        android:id="@+id/homeFragment"
        android:name="com.example.navigationbasics.HomeFragment"
        android:label="fragment_home"
        tools:layout="@layout/fragment_home">
        <action
            android:id="@+id/action_homeFragment_to_secondFragment"
            app:destination="@id/secondFragment" />
    </fragment>

    <fragment
        android:id="@+id/secondFragment"
        android:name="com.example.navigationbasics.SecondFragment"
        android:label="fragment_second"
        tools:layout="@layout/fragment_second" />

</navigation>
Code 모드로 보면 위와 같다. Action의 자동 생성된 id를 눈여겨봐두자.
#3-2 Action 사용하기 (HomeFragment.kt 수정)
...
import androidx.navigation.findNavController
...

class HomeFragment : Fragment() {
    ...

    override fun onCreateView(
        inflater: LayoutInflater, container: ViewGroup?,
        savedInstanceState: Bundle?
    ): View? {
        // Inflate the layout for this fragment
        binding = DataBindingUtil.inflate(inflater,R.layout.fragment_home, container, false)
        binding.button.setOnClickListener {
            it.findNavController().navigate(R.id.action_homeFragment_to_secondFragment)
        }
        return binding.root
    }

    ...
}
HomeFragment의 button을 누르면 방금 만든 Action이 실행되게 하는 코드다.
#3-3 실행 확인

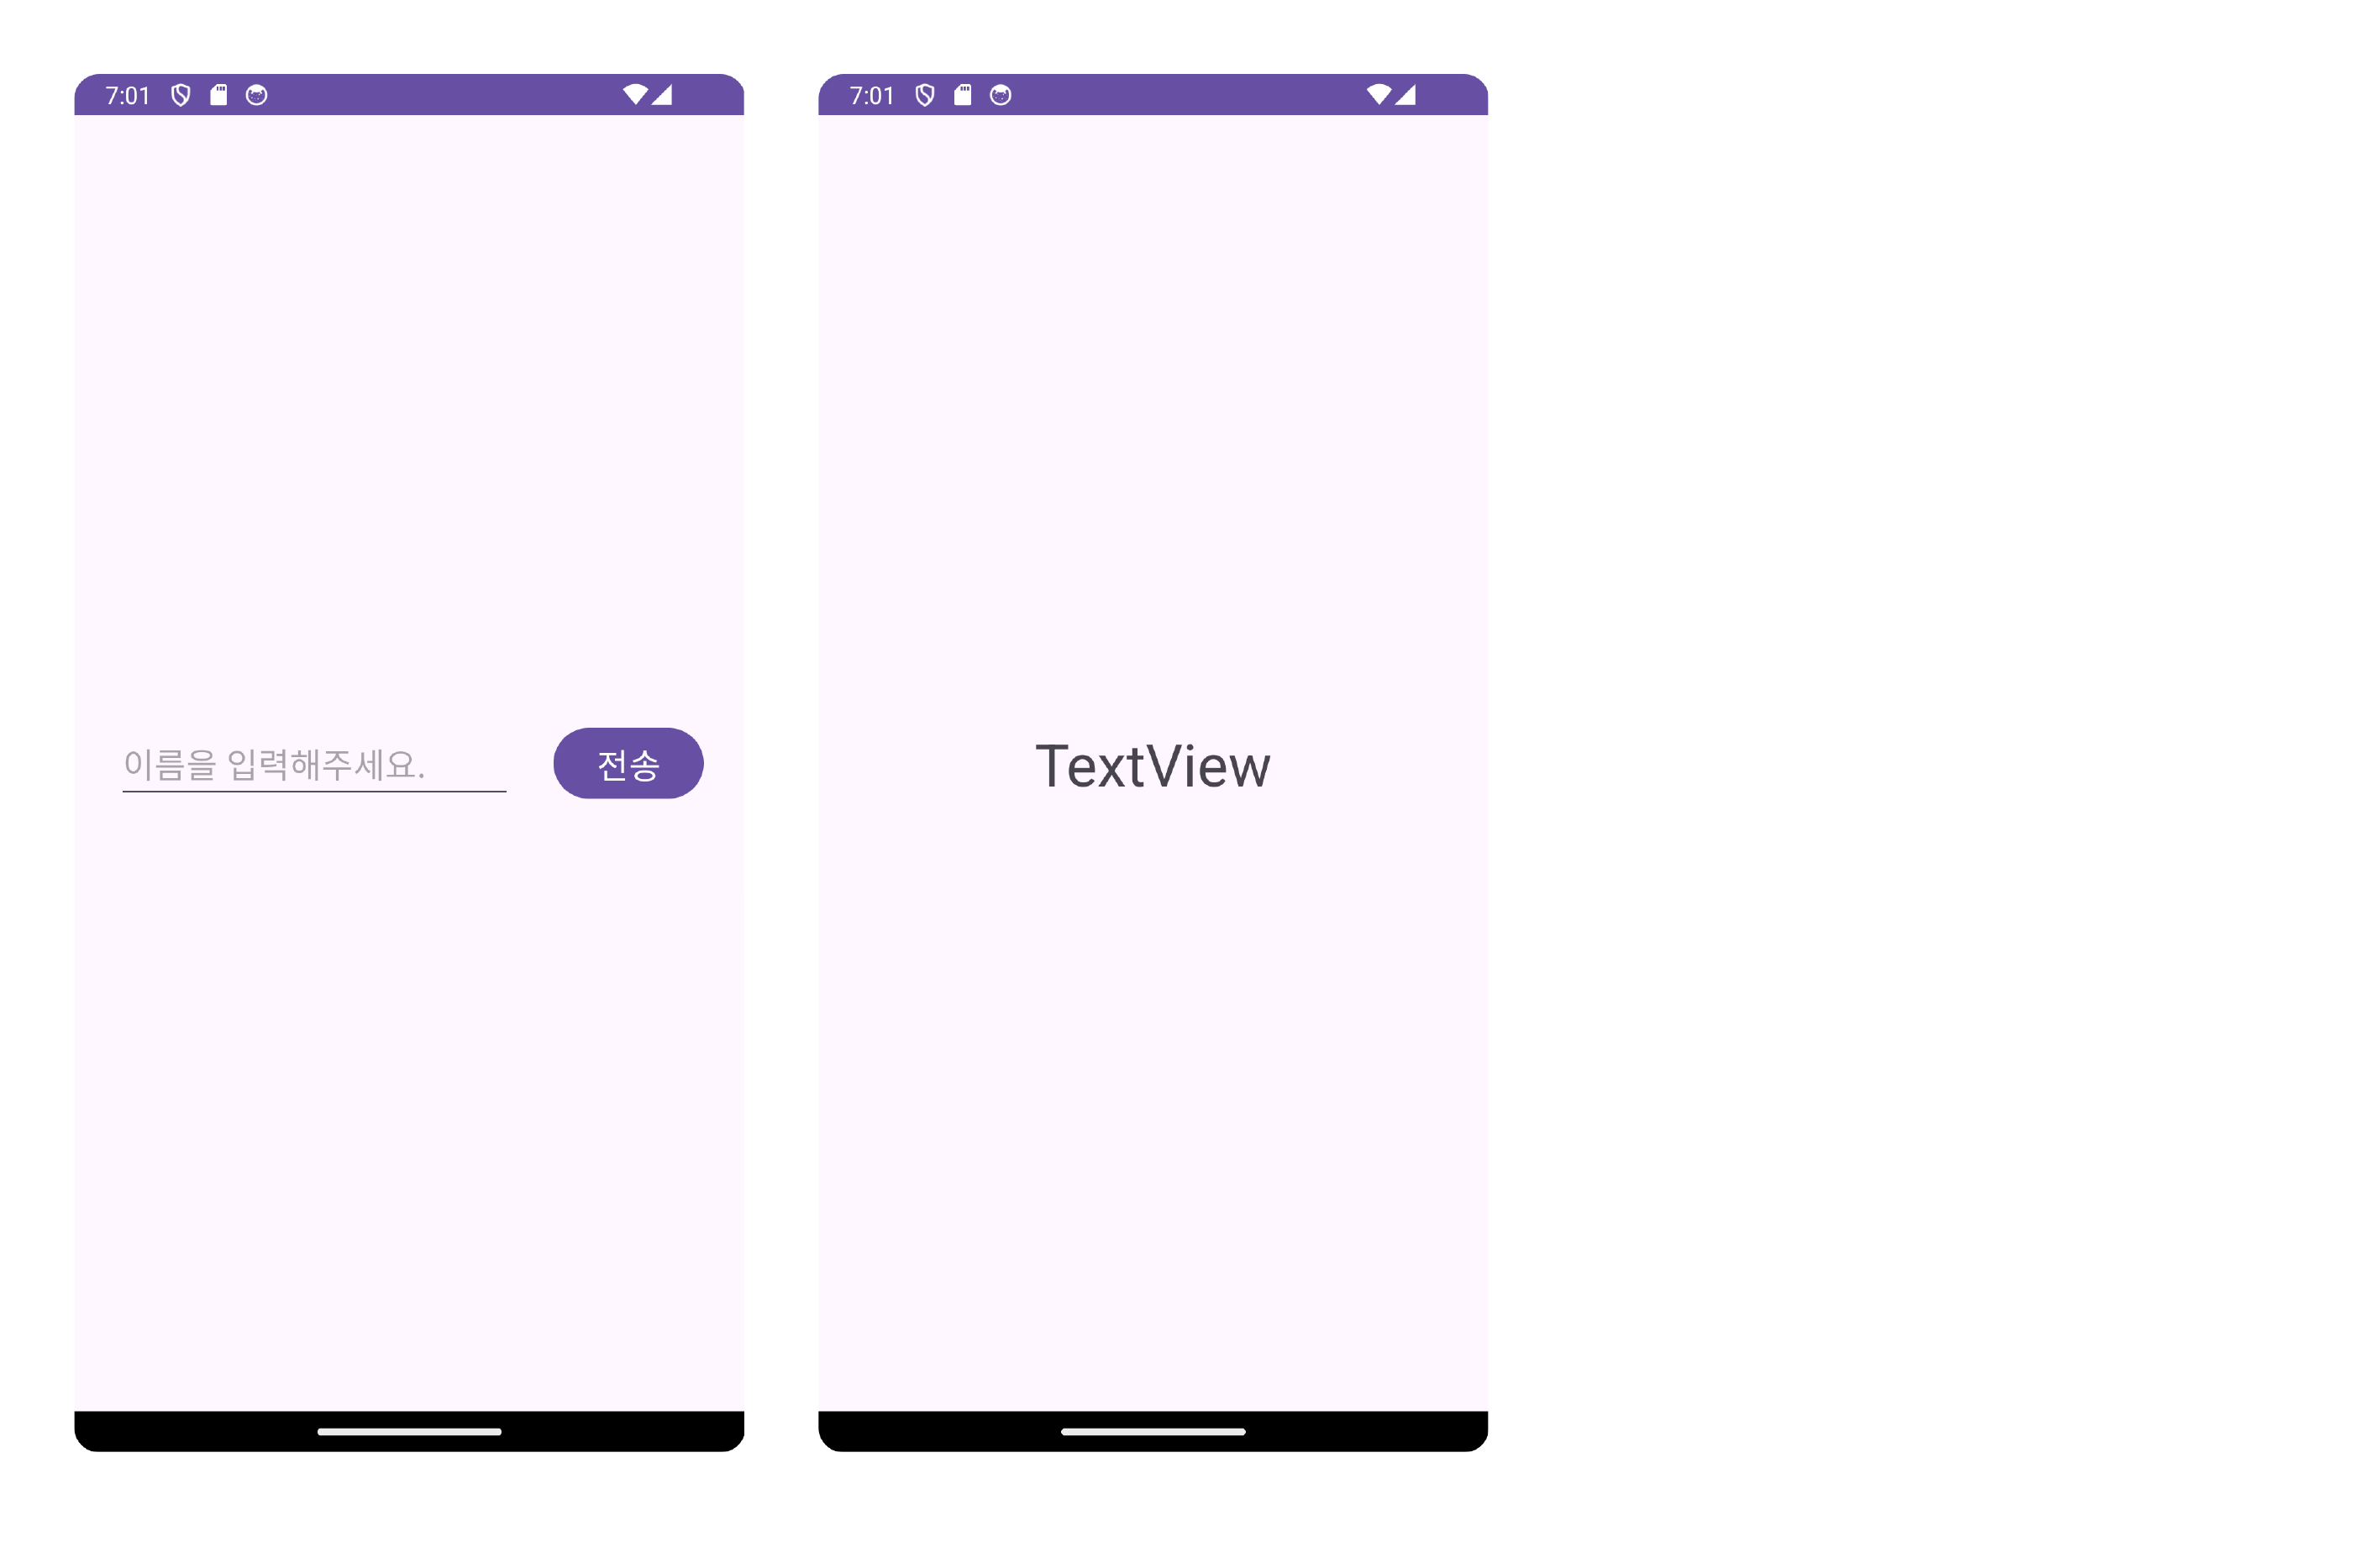
프래그먼트가 잘 전환된다.
이 다음으론 HomeFragment에서 SecondFragment로 전환할 때 데이터도 같이 전달하는 코드를 작성해본다.
#4 프래그먼트 간 데이터 전달
#4-1 HomeFragment.kt 수정
...

class HomeFragment : Fragment() {
    ...

    override fun onCreateView(
        inflater: LayoutInflater, container: ViewGroup?,
        savedInstanceState: Bundle?
    ): View? {
        ...
        binding.button.setOnClickListener {
            val userName = if(!TextUtils.isEmpty(binding.editText.text.toString())) {
                binding.editText.text.toString()
            } else {
                "이름 없음"
            }
            val bundle: Bundle = bundleOf("user_name" to userName)
            it.findNavController().navigate(R.id.action_homeFragment_to_secondFragment, bundle)
        }
        ...
    }

    ...
}
navigate() 메소드와 오버로딩 관계이면서 Bundle을 인자로 받는 메소드를 사용한다. 사실 이렇게 직접적으로 목적지(Destination) 프래그먼트에 데이터를 전달하는 것은 권장되지 않는 방법이라고 한다. 정석적인 방법은 ViewModel을 통한 데이터 전달이다.
#4-2 SecondFragment.kt 수정
...

class SecondFragment : Fragment() {
    ...

    override fun onCreateView(
        inflater: LayoutInflater, container: ViewGroup?,
        savedInstanceState: Bundle?
    ): View? {
        // Inflate the layout for this fragment
        binding = DataBindingUtil.inflate(inflater,R.layout.fragment_second, container, false)
        var userName: String? = requireArguments().getString("user_name")
        binding.textView.text = userName.toString()
        return binding.root
    }

    ...
}
Fragment.requireArguments()를 통해 전달된 Bundle을 받는다. 그리고 fragment_second.xml의 <TextView>에 표시한다.
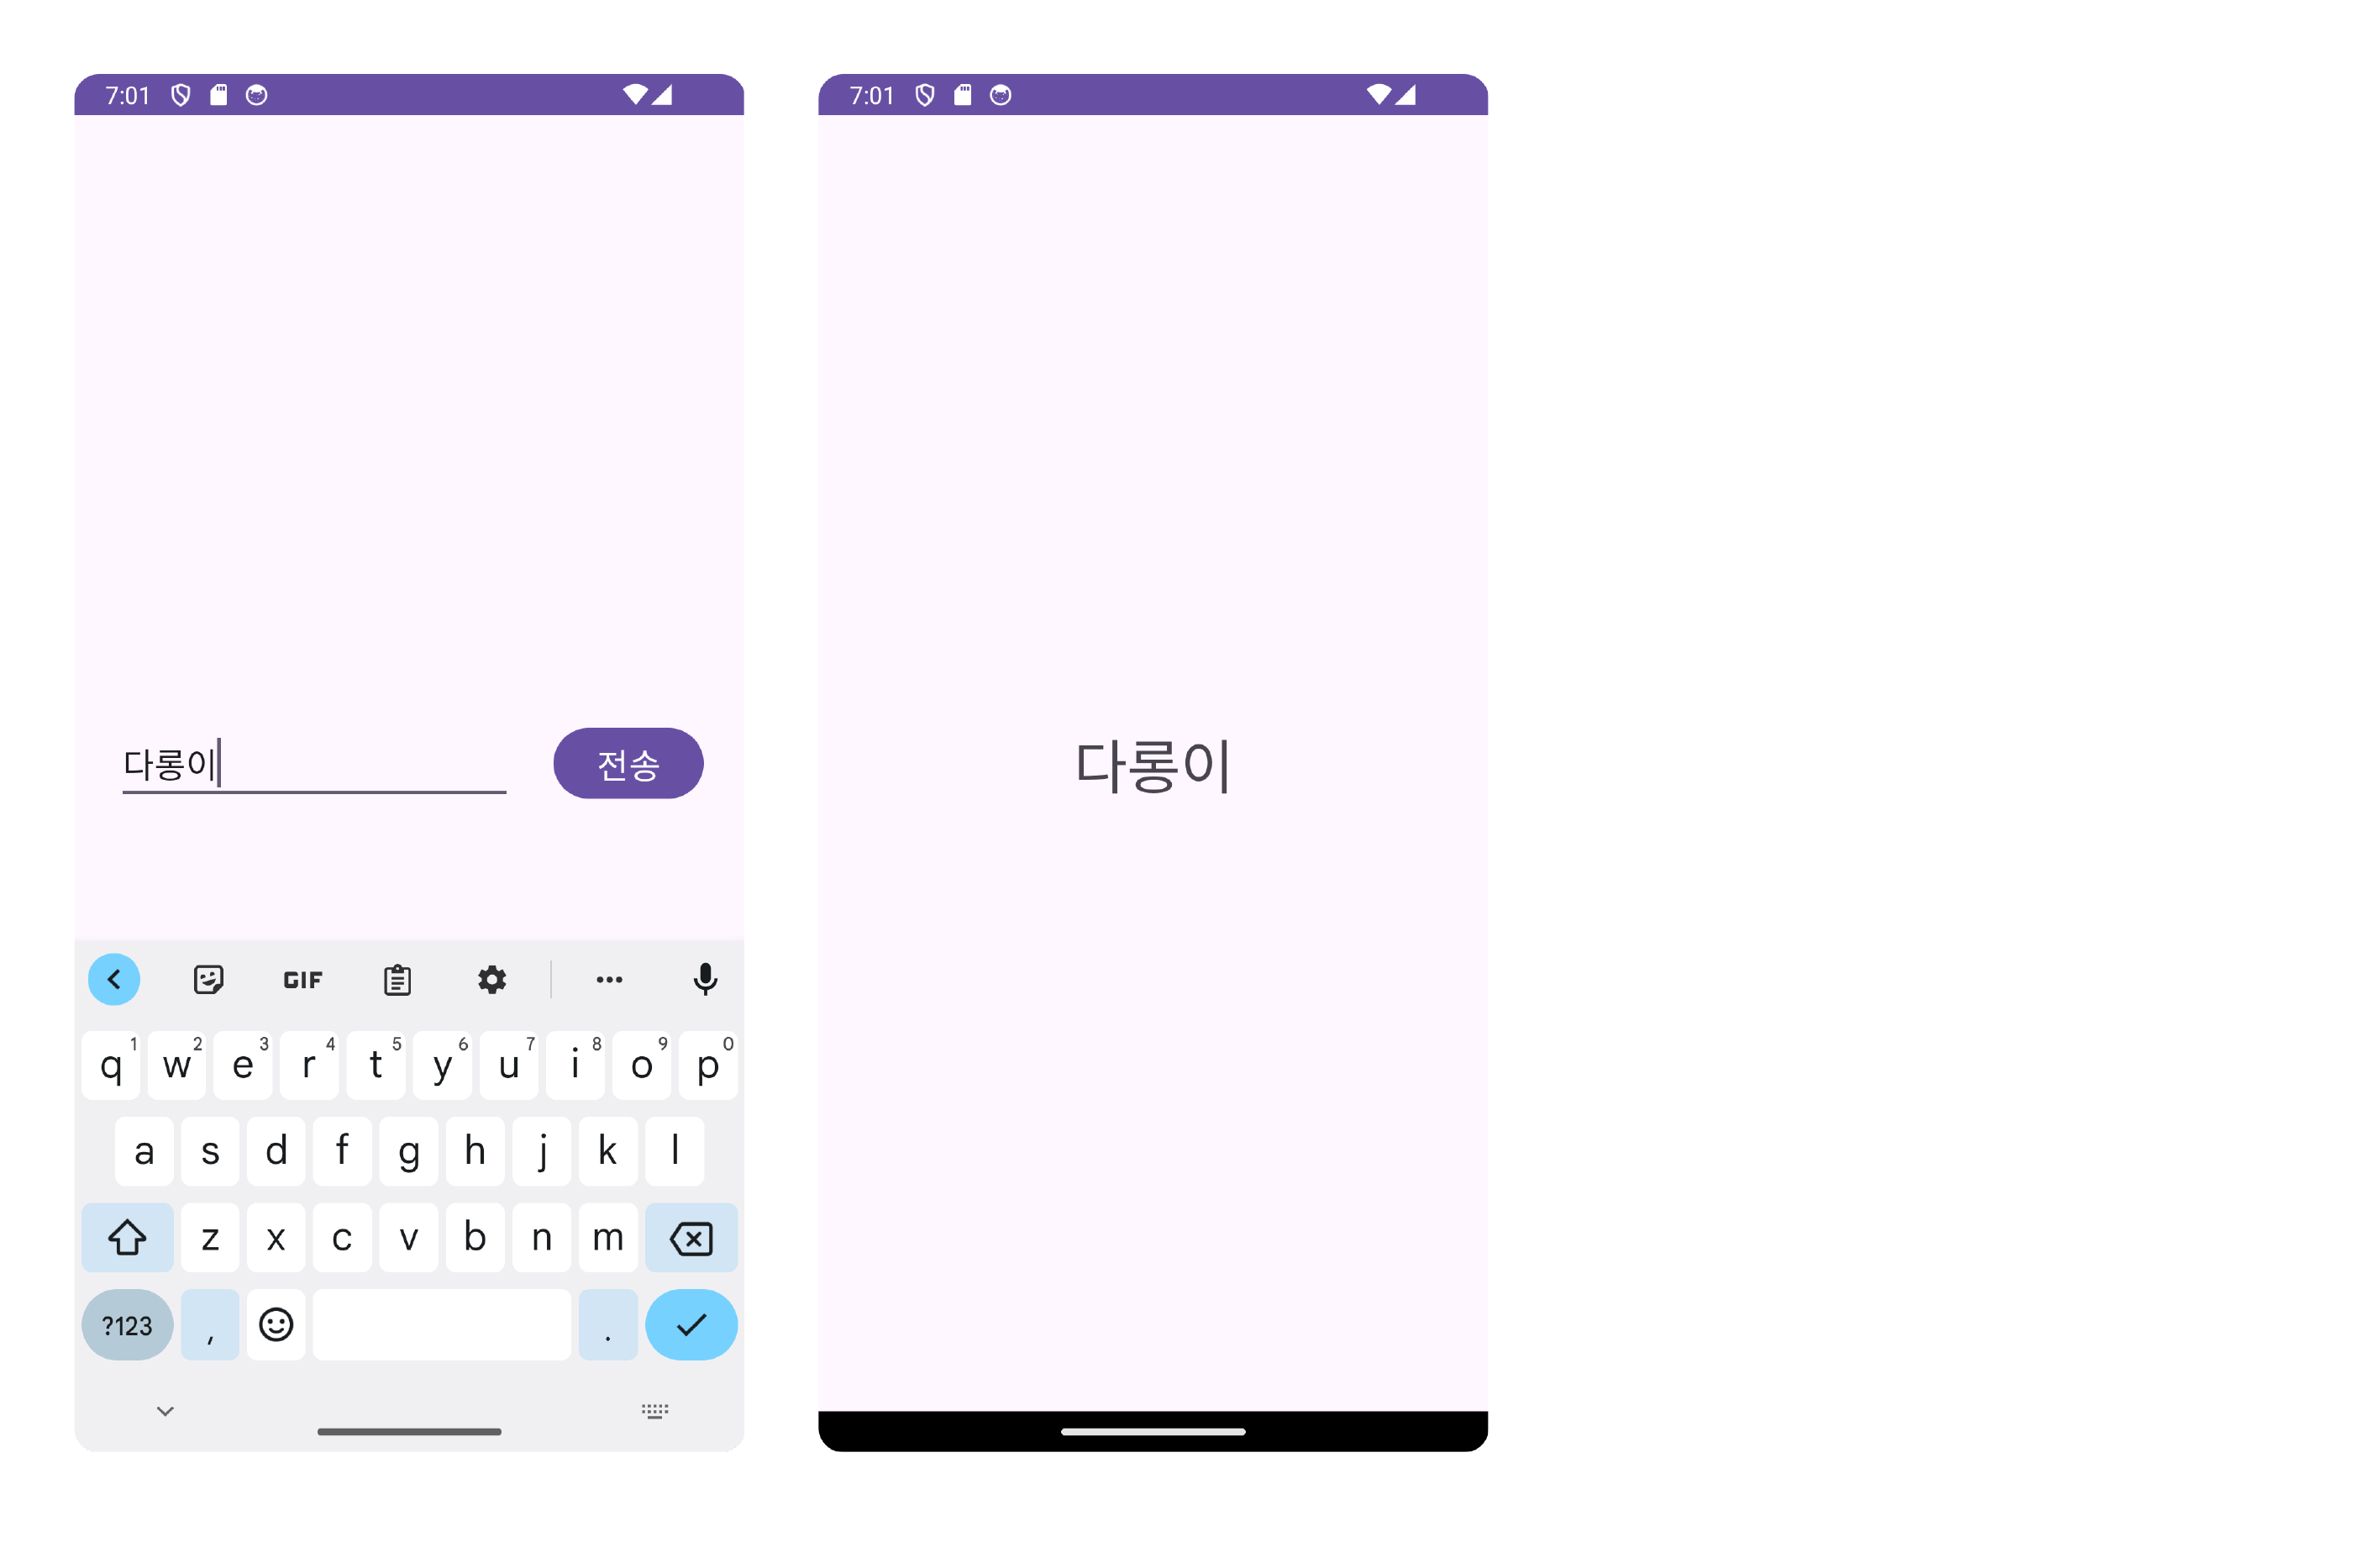
#4-3 실행 확인

#5 요약
Navigation library는 프래그먼트를 지도처럼 볼 수 있게 만들어준다.
#6 완성된 앱
android-practice/navigation/NavigationBasics at master · Kanmanemone/android-practice
Contribute to Kanmanemone/android-practice development by creating an account on GitHub.
github.com
'깨알 개념 📑 > Android' 카테고리의 다른 글
| [Android] RecyclerView - 기초 (1) | 2024.02.02 |
|---|---|
| [Android] Navigation - 애니메이션 (2) | 2024.01.27 |
| [Android] Navigation - 환경 설정 (0) | 2024.01.25 |
| [Android] Fragment의 생명주기 (0) | 2024.01.24 |
| [Android] Activity의 생명주기 (0) | 2024.01.23 |