#1 개요
UI 레이어 | Android Developers
이 페이지는 Cloud Translation API를 통해 번역되었습니다. UI 레이어 컬렉션을 사용해 정리하기 내 환경설정을 기준으로 콘텐츠를 저장하고 분류하세요. UI의 역할은 화면에 애플리케이션 데이터를
developer.android.com
안드로이드 UI 설계에 대한 공식 가이드에 기반해, 샘플 Jetpack Compose 앱을 만들어본다.
#2 앱 미리보기
#2-1 작동 화면
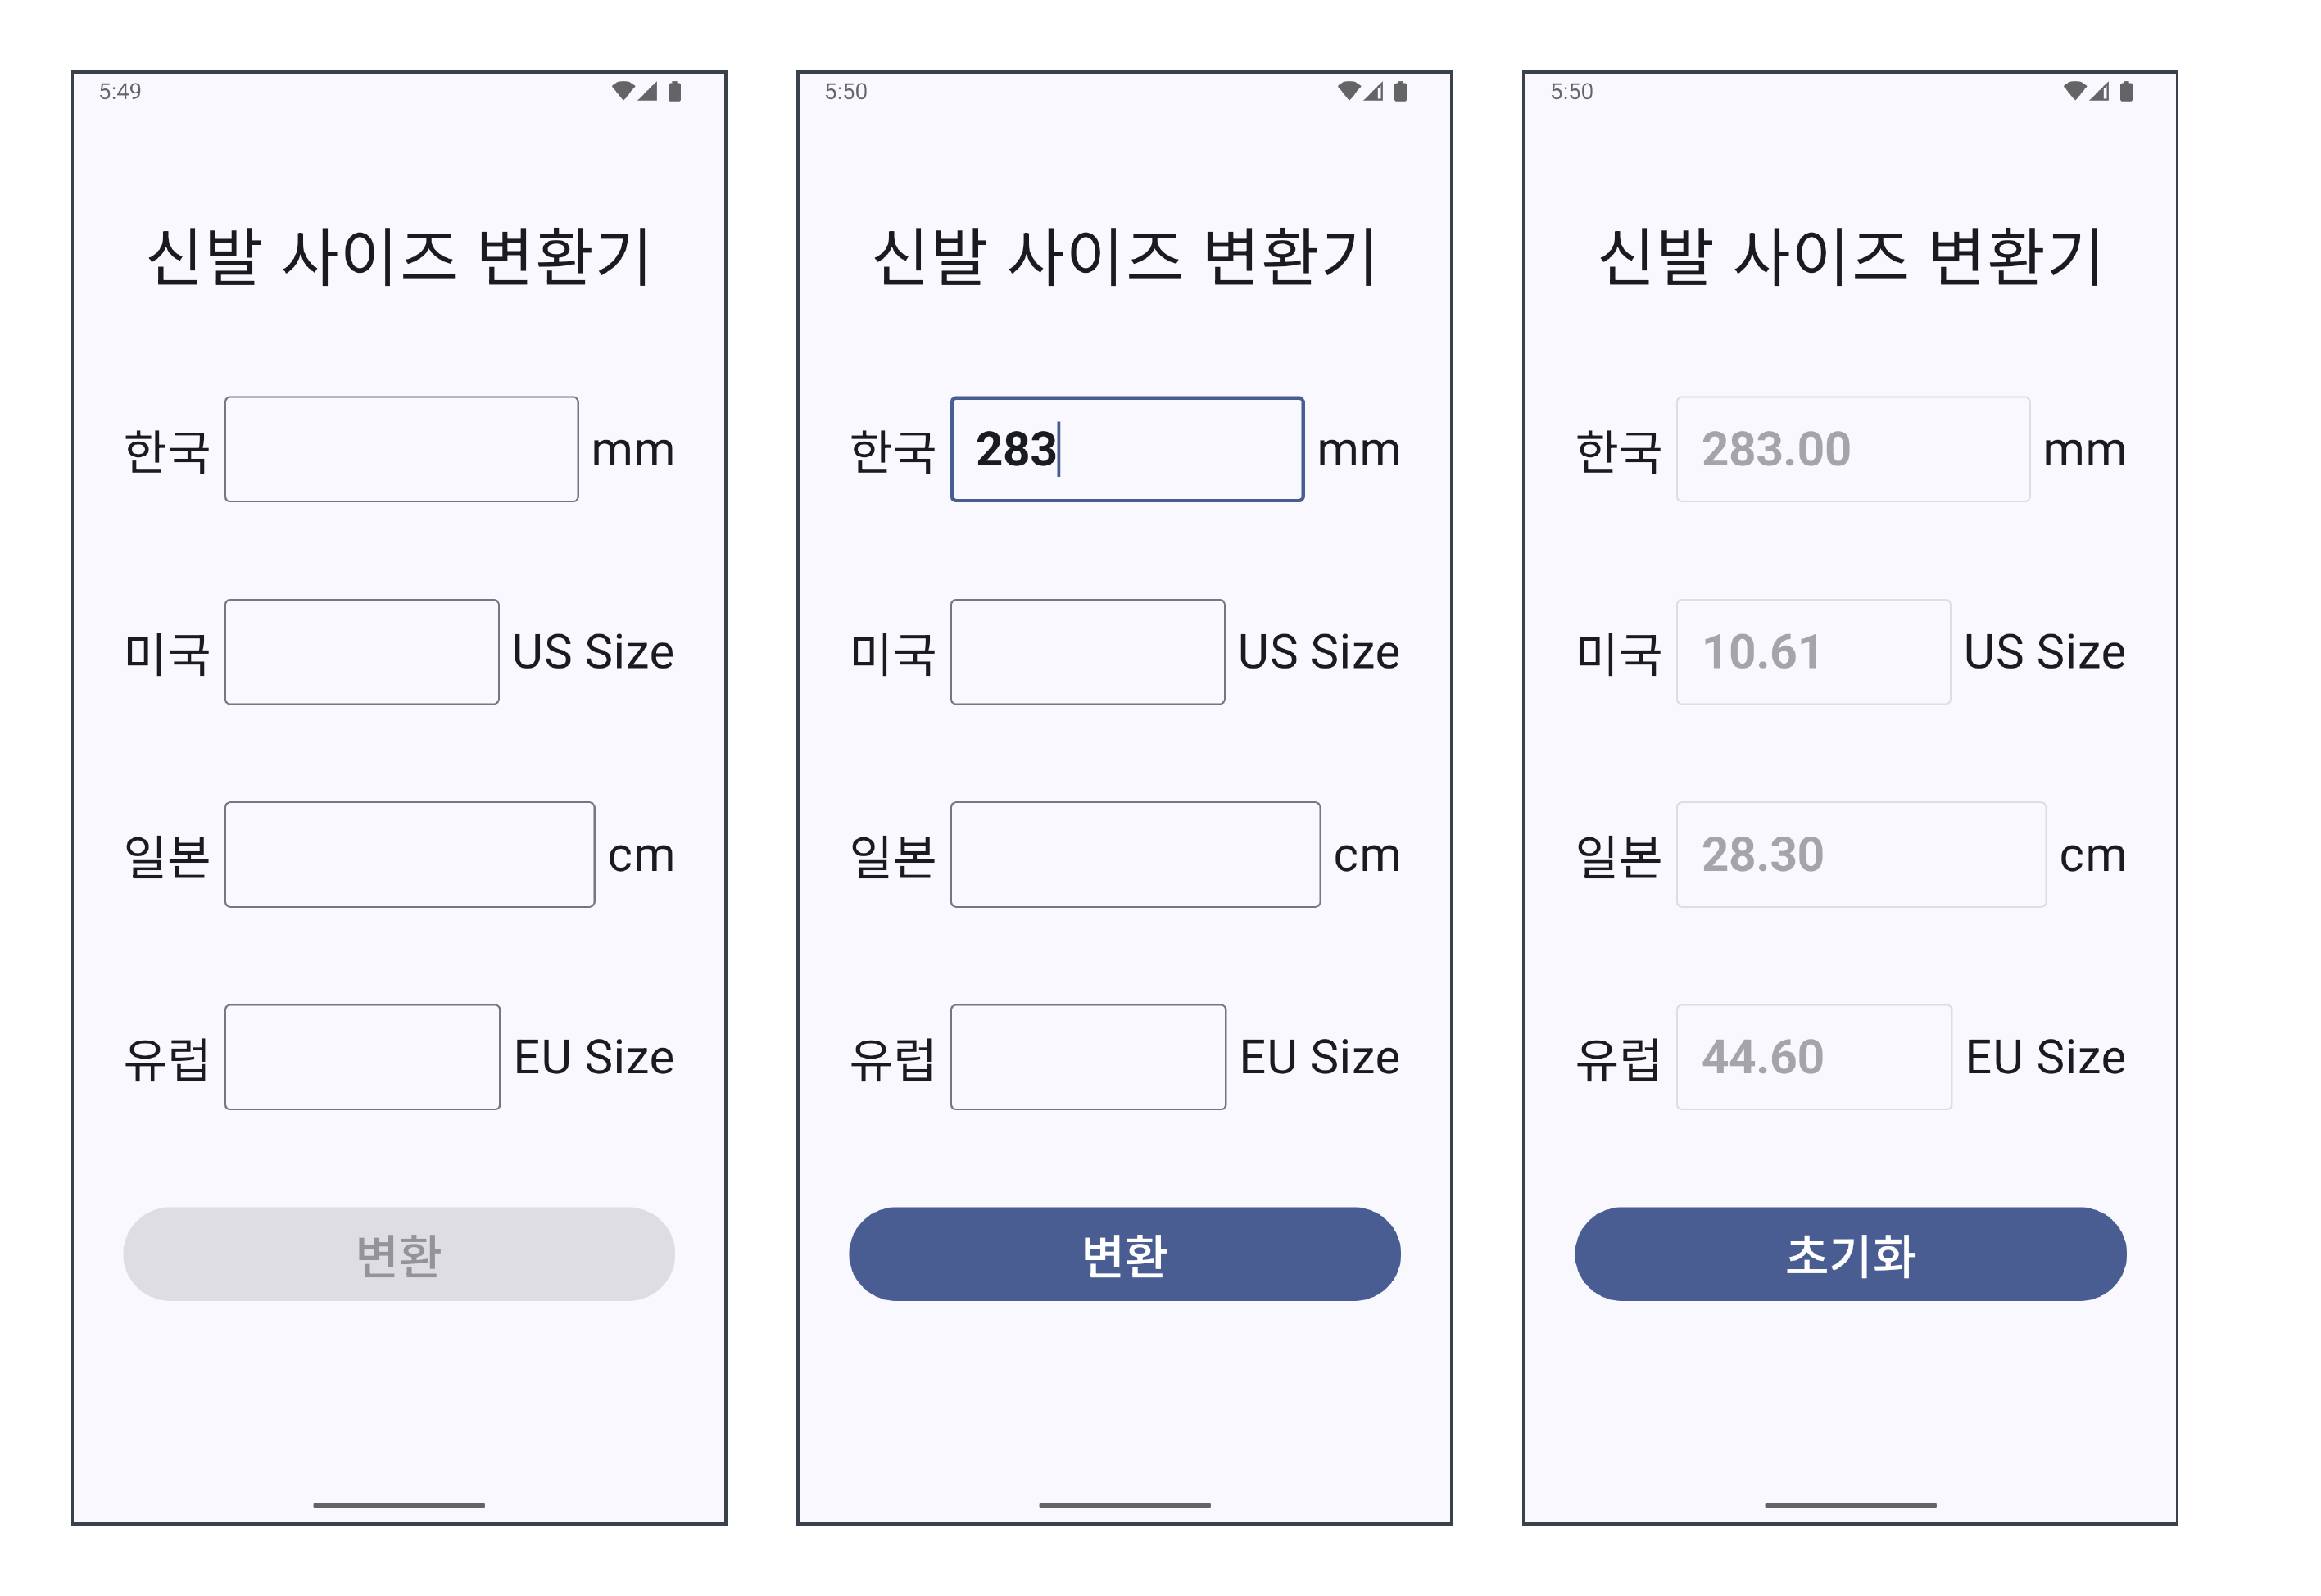
국가, 대륙 별로 다른 신발 사이즈를 상호 변환할 수 있는 간단한 앱이다. 4개의 TextField 중 아무 TextField에 값이 입력되면 "변환" 버튼이 활성화되어 클릭이 가능해진다. 4개의 TextField 중 오직 하나에만 값 입력이 가능하기에, 예를 들어 한국에 값을 입력했다가 다시 미국에 값을 입력하면 한국에 입력되었던 값은 사라진다. 변환 완료 후에는 모든 TextField가 비활성화되어 값을 입력할 수 없게되고, "변환" 버튼의 텍스트가 "초기화"로 변한다. "초기화" 버튼을 누르면 초기 화면으로 돌아간다.
#2-2 에러 처리
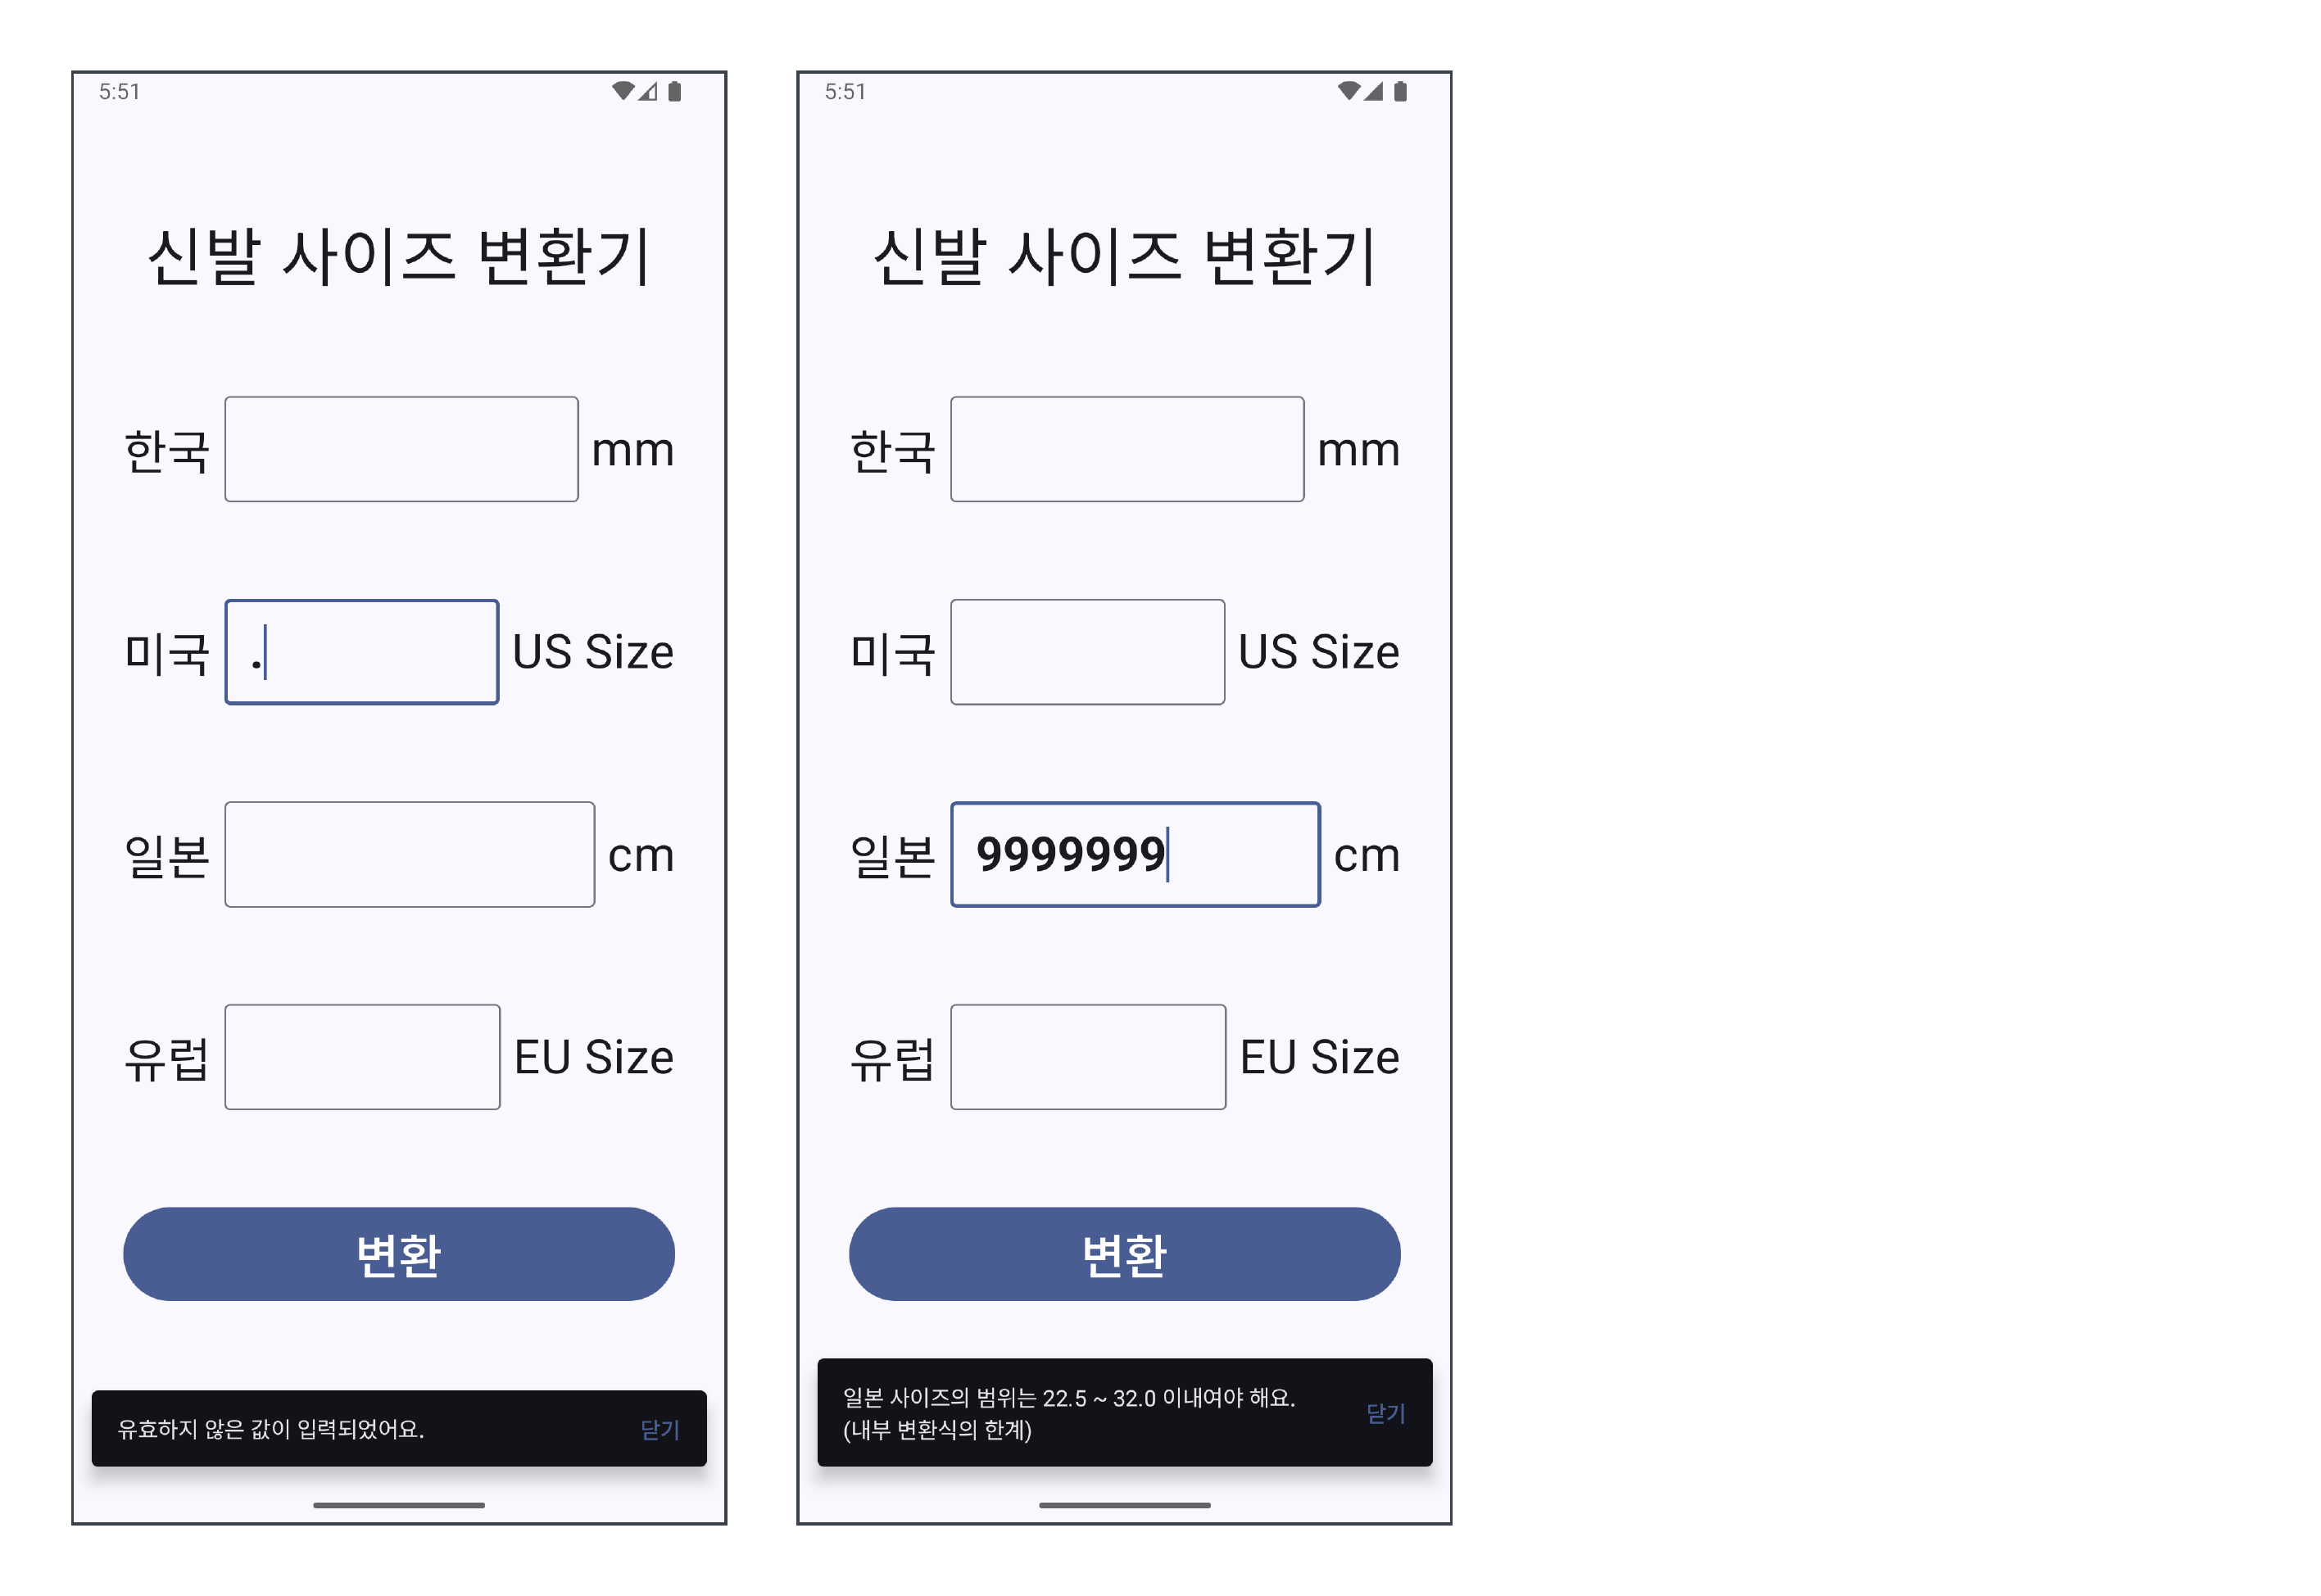
사용자가 "변환" 버튼을 눌렀을 때 변환이 불가능하다면, 변환이 불가능한 이유를 Snackbar로 표시한다.
#3 구조
#3-1 단방향 데이터 흐름
[Android] Jetpack Compose - State Hoisting
#1 개요 상태를 호이스팅할 대상 위치 | Jetpack Compose | Android Developers이 페이지는 Cloud Translation API를 통해 번역되었습니다. 상태를 호이스팅할 대상 위치 컬렉션을 사용해 정리하기 내 환경
kenel.tistory.com
State Hoisting 패턴은 단방향 데이터 흐름(Unidirectional Data Flow)을 구현하기 위한 도구였다. 여기에서도 마찬가지로 단방향 데이터 흐름을 구현할 것이다. State Hoisting의 효과를 극대화시키기 위해 ViewModel을 사용할 건데, 이는 ViewModel에서 View로 State를 보내고 View에서는 ViewModel로 Event를 보내는 구조를 형성할 것이다.
#3-2 단방향 데이터 흐름의 도식도 - 공식 문서

간단한 앱을 만들 거라서 Data Layer는 구현하지 않을 것이다. 즉, 샘플 앱에는 ViewModel과 View만 존재할 것이다.
#3-3 단방향 데이터 흐름의 도식도 - 내가 만들 앱

#3-2을 실제 사용할 클래스이름 및 컴포저블 함수 이름으로 바꿨다. 여기서 이벤트는 sealed class로 구현(#4-2 참조)할 것인데, 이는 프로젝트의 객체 지향성을 드높혀줄 것이다.
#4 구현
#4-1 State 클래스
// package com.example.objectorienteduilayer

data class MainScreenState(
    var inputtedKrSize: String,
    var inputtedUsSize: String,
    var inputtedJpSize: String,
    var inputtedEuSize: String,
    var isInputEnabled: Boolean,

    var buttonText: String,
    var isButtonEnabled: Boolean,
)
State 클래스에는 화면(View)에 표시 가능한 모든 것을 정의한다. 4개의 TextField에 들어갈 Text 뿐만 아니라, 해당 TextField들의 활성화/비활성화 여부 그리고 Button의 경우에도 버튼 내부 텍스트 내용과 버튼 활성화/비활성화 여부를 정의한다.
#4-2 (sealed class로 구현하는) 이벤트 클래스
// package com.example.objectorienteduilayer.event

import com.example.objectorienteduilayer.CountryInfo

sealed class MainViewModelEvent {
    // 인수를 가지기에, 각 인스턴스는 서로 구별됨. 따라서 data class로 두어 복수 개의 인스턴스를 가지게 해야 함
    data class SizeInputted(val country: CountryInfo, val inputtedSize: String) : MainViewModelEvent()

    // 인수를 가지지 않기에, 각 인스턴스는 전부 똑같음. 따라서 data object로 두어 하나의 인스턴스만 가지게 해야 함 (자원 절약)
    data object ConvertShoeSize : MainViewModelEvent()
    data object ResetData : MainViewModelEvent()
}
앱 사용자가 View에 무언가를 조작(= Event 발생)하면, 해당 이벤트를 ViewModel에 보내주어야 한다 (단방향 데이터 흐름 구현). 이 이벤트 클래스들을 "MainViewModelEvent"라는 이름을 가진 클래스에 넣음으로써 같은 곳에서 처리할 이벤트임을 구조 그 자체로 (나, 그리고 내 코드를 볼 동료에게) 직관적으로 보인다. 또, MainViewModelEvent는 그냥 클래스가 아니라 제한된 자식만을 가지는 sealed class로 선언되어있다. sealed class는 enum class와 비슷하다. 바로, 유한하고 고정된 갯수의 집합을 표현할 수 있다는 장점을 공유한다는 점에서 그렇다. 그렇다면 이렇게 구현된 sealed class는 어떻게 처리되는가?
// in ViewModel

fun onEvent(event: MainViewModelEvent) {
    when (event) {
        is MainViewModelEvent.SizeInputted -> {
            ...
        }

        is MainViewModelEvent.ConvertShoeSize -> {
            ...
        }

        is MainViewModelEvent.ResetData -> {
            ...
        }
    }
}
바로 위와 같이 ViewModel에 정의될, 이벤트 구현용 클래스를 매개변수로 받는 함수인 onEvent() 속 분기문(when)을 통해 sealed class MainViewModelEvent의 자식 클래스들이 처리된다.
#4-3 ViewModel
// package com.example.objectorienteduilayer

import androidx.compose.runtime.State
import androidx.compose.runtime.mutableStateOf
import androidx.lifecycle.ViewModel
import androidx.lifecycle.viewModelScope
import com.example.objectorienteduilayer.event.MainScreenEvent
import com.example.objectorienteduilayer.event.MainViewModelEvent
import kotlinx.coroutines.flow.MutableSharedFlow
import kotlinx.coroutines.flow.SharedFlow
import kotlinx.coroutines.flow.asSharedFlow
import kotlinx.coroutines.launch

class MainViewModel : ViewModel() {

    // (1) 화면 표시용 State
    private val _mainScreenState = mutableStateOf(
        MainScreenState(
            inputtedKrSize = "",
            inputtedUsSize = "",
            inputtedJpSize = "",
            inputtedEuSize = "",
            isInputEnabled = true,

            buttonText = "변환",
            isButtonEnabled = false
        )
    )
    val mainScreenState: State<MainScreenState>
        get() = _mainScreenState

    // (2) MainScreenEvent: View에서 사용할 이벤트지만, 해당 이벤트를 트리거(발생)시키기 위해서 해당 이벤트를 담는 Flow 인스턴스만 선언 (이후에, View에서 이 Flow를 collect()하여 이벤트를 구현할 것임)
    private val _mainScreenEventFlow = MutableSharedFlow<MainScreenEvent>()
    val mainScreenEventFlow: SharedFlow<MainScreenEvent>
        get() = _mainScreenEventFlow.asSharedFlow()

    // (3) MainViewModelEvent: View로부터 받은 이벤트와 그 처리
    fun onEvent(event: MainViewModelEvent) {
        when (event) {
            is MainViewModelEvent.SizeInputted -> {
                _mainScreenState.value = when (event.country) {
                    CountryInfo.KR -> _mainScreenState.value.copy(
                        inputtedKrSize = event.inputtedSize,
                        inputtedUsSize = "",
                        inputtedJpSize = "",
                        inputtedEuSize = "",
                    )

                    CountryInfo.US -> _mainScreenState.value.copy(
                        inputtedKrSize = "",
                        inputtedUsSize = event.inputtedSize,
                        inputtedJpSize = "",
                        inputtedEuSize = "",
                    )

                    CountryInfo.JP -> _mainScreenState.value.copy(
                        inputtedKrSize = "",
                        inputtedUsSize = "",
                        inputtedJpSize = event.inputtedSize,
                        inputtedEuSize = "",
                    )

                    CountryInfo.EU -> _mainScreenState.value.copy(
                        inputtedKrSize = "",
                        inputtedUsSize = "",
                        inputtedJpSize = "",
                        inputtedEuSize = event.inputtedSize,
                    )
                }

                // '변환' 버튼 활성화 여부 결정
                _mainScreenState.value.isButtonEnabled =
                    !(_mainScreenState.value.inputtedKrSize.isEmpty() &&
                    _mainScreenState.value.inputtedUsSize.isEmpty() &&
                    _mainScreenState.value.inputtedJpSize.isEmpty() &&
                    _mainScreenState.value.inputtedEuSize.isEmpty())
            }

            is MainViewModelEvent.ConvertShoeSize -> {
                // 값 하나만 추리기
                val inputtedSizes: Map<CountryInfo, String> = mapOf(
                    CountryInfo.KR to _mainScreenState.value.inputtedKrSize,
                    CountryInfo.US to _mainScreenState.value.inputtedUsSize,
                    CountryInfo.JP to _mainScreenState.value.inputtedJpSize,
                    CountryInfo.EU to _mainScreenState.value.inputtedEuSize
                ).filter { // 빈 문자열이 아닌 값만 필터링 (이로 인해 분명 하나의 element만 남을 것임, 하나의 TextField에만 값이 들어가도록 이미 조치가 되어있기 때문)
                    it.value != ""
                }

                // (값 검증 - 1) 값이 하나인지  (사실상 나오지 않을 분기 ∵ 하나의 TextField에만 값이 들어가도록 이미 조치가 되어있기 때문)
                if (inputtedSizes.size != 1) {
                    viewModelScope.launch {
                        _mainScreenEventFlow.emit(
                            MainScreenEvent.ShowSnackbar("신발 사이즈가 2군데 이상 입력되었어요.")
                        )
                    }
                    return
                }

                // (값 검증 - 2) Double형으로 변환 가능한 지
                val inputtedSize = inputtedSizes.entries.first()
                val inputtedSizeValue = inputtedSize.value.toDoubleOrNull()

                if (inputtedSizeValue == null) {
                    viewModelScope.launch {
                        _mainScreenEventFlow.emit(
                            MainScreenEvent.ShowSnackbar("유효하지 않은 값이 입력되었어요.")
                        )
                    }
                    return
                }

                // 값 변환과 동시에 State 업데이트
                try {
                    _mainScreenState.value = _mainScreenState.value.copy(
                        inputtedKrSize = ConversionFormula.formatToTwoDecimalPlaces( // 값 반올림 함수
                            ConversionFormula.sizeToOtherSize(inputtedSize.key, inputtedSizeValue, CountryInfo.KR)), // 값 변환 함수
                        inputtedUsSize = ConversionFormula.formatToTwoDecimalPlaces(
                            ConversionFormula.sizeToOtherSize(inputtedSize.key, inputtedSizeValue, CountryInfo.US)),
                        inputtedJpSize = ConversionFormula.formatToTwoDecimalPlaces(
                            ConversionFormula.sizeToOtherSize(inputtedSize.key, inputtedSizeValue, CountryInfo.JP)),
                        inputtedEuSize = ConversionFormula.formatToTwoDecimalPlaces(
                            ConversionFormula.sizeToOtherSize(inputtedSize.key, inputtedSizeValue, CountryInfo.EU)),
                        isInputEnabled = false,

                        buttonText = "초기화",
                        isButtonEnabled = true
                    )

                // (값 검증 - 3) 값 변환 과정에서 사용되는 ConversionFormula에서 발생할 여지가 있는 Exception를 catch
                } catch (e: ConversionFormula.SizeOutOfBoundsException) {
                    viewModelScope.launch {
                        _mainScreenEventFlow.emit(
                            MainScreenEvent.ShowSnackbar("${inputtedSize.key.countryName} 사이즈의 범위는 ${e.minSize} ~ ${e.maxSize} 이내여야 해요.\n(내부 변환식의 한계)")
                        )
                    }
                    return
                }
            }

            is MainViewModelEvent.ResetData -> {
                _mainScreenState.value = _mainScreenState.value.copy(
                    inputtedKrSize = "",
                    inputtedUsSize = "",
                    inputtedJpSize = "",
                    inputtedEuSize = "",
                    isInputEnabled = true,

                    buttonText = "변환",
                    isButtonEnabled = false
                )
            }
        }
    }
}
(1) 화면 표시용 State
Model이 '재료'고 View가 '요리'라면, View Model은 '필요한 재료가 올라가있는 도마'다. 따라서, ViewModel에서 State를 보유해야하며 이를 View에서 참조한다. 혹시 이름 앞에 쓰인 언더바(_)가 쓰인 변수와 언더바가 없는 변수의 차이를 모르겠다면, 이 게시글의 #2을 참조한다.
(2) MainScreenEvent
View에서 발생할 이벤트를 트리거(발생)시키기 위한 Flow 인스턴스를 선언한다. 주의할 점은 이 코드는 이벤트를 구현한 코드가 아니라는 점이다. #3-2의 도식도에서도 ViewModel에서 View로 Event를 보내는 건 찾아볼 수 없지 않은가. 이벤트를 트리거하기 위한 코드와 이벤트가 무슨 동작을 하는 지를 구현한 코드는 다르다. 후자의 코드에서 말하는 '구현'이란, onEvent() 함수와 같은 형태를 말하는 것이다.
(3) MainViewModelEvent
#4-2에서 논했던 onEvent()다.
#4-4 Activity
// package com.example.objectorienteduilayer

// import가 너무 많아 생략

class MainActivity : ComponentActivity() {
    override fun onCreate(savedInstanceState: Bundle?) {
        super.onCreate(savedInstanceState)
        enableEdgeToEdge()
        setContent {
            ObjectOrientedUILayerTheme {
                MainScreen()
            }
        }
    }
}

@Composable
fun MainScreen(
    modifier: Modifier = Modifier,
    viewModel: MainViewModel = viewModel<MainViewModel>()
) {

    // (1) 스낵바 표시를 위한 코루틴 영역 그리고 스낵바의 상태 선언
    val scope = rememberCoroutineScope()
    val snackbarHostState = remember { SnackbarHostState() }

    // (2) MainScreen에서 발생할 수 있는 이벤트 구현. ViewModel에서 트리거(발생)시킬 것이므로, ViewModel의 Flow를 collect()하는 방식으로 이벤트를 작성
    LaunchedEffect(key1 = true) { // 이 조건식(key1 = true)의 의미: MainScreen의 생애 주기에서 딱 한번 실행되고, MainScreen이 죽을 때까지 collect가 유지됨
        viewModel.mainScreenEventFlow.collectLatest { event ->
            when (event) {
                is MainScreenEvent.ShowSnackbar -> {
                    scope.launch {
                        snackbarHostState.showSnackbar(
                            message = event.message,
                            duration = SnackbarDuration.Short
                        )
                    }
                }
            }
        }
    }

    Scaffold(
        modifier = Modifier.fillMaxSize(),
        snackbarHost = {
            SnackbarHost(
                // 앞에서 선언했던 '스낵바의 상태'를 주입
                hostState = snackbarHostState,
                // 스낵바의 모양 (외형 정의)
                snackbar = { snackbarData ->
                    Snackbar(
                        modifier = Modifier.padding(12.dp),
                        dismissAction = { // 닫기 버튼도 달아준다
                            TextButton(
                                onClick = { snackbarData.dismiss() }
                            ) {
                                Text(text = "닫기")
                            }
                        }
                    ) {
                        Text(text = snackbarData.visuals.message)
                    }
                }
            )
        }
    ) { innerPadding ->
        Column(
            modifier = Modifier
                .fillMaxSize()
                .padding(innerPadding)
                .padding(horizontal = 16.dp)
                .padding(bottom = 56.dp), // bottom에 표시될 스낵바의 높이만큼의 공간을 추가로 확보
            verticalArrangement = Arrangement.SpaceEvenly,
            horizontalAlignment = Alignment.CenterHorizontally
        ) {
            val screenState = viewModel.mainScreenState.value

            Text(text = "신발 사이즈 변환기", fontSize = 40.sp)

            // (3) State Hoisting 패턴으로 하위 컴포저블 구성
            SizeInputField(CountryInfo.KR, screenState.inputtedKrSize, screenState.isInputEnabled) { inputtedSize ->
                viewModel.onEvent(MainViewModelEvent.SizeInputted(CountryInfo.KR, inputtedSize))
            }

            SizeInputField(CountryInfo.US, screenState.inputtedUsSize, screenState.isInputEnabled) { inputtedSize ->
                viewModel.onEvent(MainViewModelEvent.SizeInputted(CountryInfo.US, inputtedSize))
            }

            SizeInputField(CountryInfo.JP, screenState.inputtedJpSize, screenState.isInputEnabled) { inputtedSize ->
                viewModel.onEvent(MainViewModelEvent.SizeInputted(CountryInfo.JP, inputtedSize))
            }

            SizeInputField(CountryInfo.EU, screenState.inputtedEuSize, screenState.isInputEnabled) { inputtedSize ->
                viewModel.onEvent(MainViewModelEvent.SizeInputted(CountryInfo.EU, inputtedSize))
            }

            // (4) 버튼 구현
            Button(
                onClick = {
                    when (screenState.buttonText) {
                        "변환" -> { viewModel.onEvent(MainViewModelEvent.ConvertShoeSize) }
                        "초기화" -> { viewModel.onEvent(MainViewModelEvent.ResetData) }
                    }
                },
                modifier = Modifier
                    .fillMaxWidth()
                    .padding(horizontal = 16.dp),
                enabled = screenState.isButtonEnabled
            ) {
                Text(text = screenState.buttonText, fontSize = 30.sp)
            }
        }
    }
}

@Composable
fun SizeInputField(
    country: CountryInfo,
    valueParam: String,
    enabledParam: Boolean,
    onValueChangeParam: (String) -> Unit
) {
    Row(
        modifier = Modifier
            .fillMaxWidth()
            .padding(horizontal = 16.dp),
        horizontalArrangement = Arrangement.Center,
        verticalAlignment = Alignment.CenterVertically
    ) {
        Text(text = "${country.countryName} ", fontSize = 30.sp)

        OutlinedTextField(
            value = valueParam,
            onValueChange = { inputtedSize ->
                // 0 ~ 9와 점(.)만 입력되도록 필터링
                var filteredInput = inputtedSize.replace(Regex("[^0-9.]"), "")
                // 점이 하나 이상 입력되지 않도록 필터링
                val dotCount = filteredInput.count { it == '.' }
                filteredInput = if (dotCount > 1) {
                    val firstDotIndex = filteredInput.indexOf('.')
                    val secondDotIndex = filteredInput.indexOf('.', firstDotIndex + 1)
                    filteredInput.substring(0, secondDotIndex) // 두 번째 점 이전까지의 문자열만 사용
                } else {
                    filteredInput
                }
                // 필터링된 값 ViewModel에 전달
                onValueChangeParam(filteredInput)
            },
            modifier = Modifier.weight(1f), // Row에서 2개의 Text()를 표시하고 남은 자리를, OutlinedTextField()가 전부 차지하게 만듦
            textStyle = TextStyle(
                fontSize = 30.sp,
                fontWeight = FontWeight.Bold
            ),
            enabled = enabledParam,
            keyboardOptions = KeyboardOptions(
                keyboardType = KeyboardType.Number
            ),
            singleLine = true
        )

        Text(text = " ${country.shoeSizeUnit}", fontSize = 30.sp)
    }
}
(1) 스낵바 표시를 위한 코루틴 영역 그리고 스낵바의 상태 선언
Scaffold의 Snackbar에 대해 다룬 이 게시글의 #5 참조.
(2) MainScreen에서 발생할 수 있는 이벤트 구현
ViewModel의 onEvent()와 동일한 동작을 하는 코드다. 즉, 이벤트를 실제로 구현하는 부분이다. 왜 다른 Flow들을 제쳐두고 SharedFlow를 통해 이벤트를 트리거(발생)시키는 지가 궁금하다면 이 게시글의 #4을 참조하자. 아니면 아예, 왜 굳이 Flow를 쓰는 지가 궁금하다면 이 게시글의 #4를 참조한다. 이 이벤트 또한 sealed class로 구현한다. 해당 클래스의 소스 코드는 #7에 있는 깃허브 링크에서 확인하자.
(3) State Hoisting 패턴으로 하위 컴포저블 구성
ViewModel을 통한 State Hoisting 패턴 구현에 대해 다룬 이 게시글 참조.
(4) 버튼 구현
(3)과 마찬가지로, ViewModel로부터 State를 받고 Event는 역으로 ViewModel에게 보낸다.
#4-5 ConversionFormula (수학 계산용)
// package com.example.objectorienteduilayer

import org.apache.commons.math3.analysis.interpolation.SplineInterpolator
import org.apache.commons.math3.analysis.polynomials.PolynomialSplineFunction
import java.text.DecimalFormat

object ConversionFormula {

    fun sizeToOtherSize(
        sourceCountry: CountryInfo, sourceSize: Double, targetCountry: CountryInfo
    ): Double {
        if (sourceCountry == targetCountry) {
            return sourceSize
        } else {
            // (1) 값 변환을 위한 스플라인 함수를 아래 쪽 코드에서 정의한 Map에서 꺼내옴
            val spline = splineMap[Pair(sourceCountry, targetCountry)]!!

            // (2) sourceSize가 스플라인 함수가 지원하는 input 범위 내에 있는 지 검증
            val minSize = spline.knots.first()
            val maxSize = spline.knots.last()
            if (sourceSize !in minSize..maxSize) {
                throw SizeOutOfBoundsException(
                    minSize,
                    maxSize,
                    "($sourceCountry to $targetCountry) 입력값이 (${minSize}..${maxSize}) 이내여야 합니다 (스플라인 함수의 범위를 벗어남)."
                )
            }

            // (3) 검증을 통과한 sourceSize를 변환과 동시에 return
            return spline.value(sourceSize)
        }
    }

    // sizeToOtherSize()에서 발생시킬 사용자 정의 에러
    class SizeOutOfBoundsException(
        val minSize: Double,
        val maxSize: Double,
        message: String // val이 아닌 것 같지만 val임. message는 IllegalArgumentException에서 이미 정의된 프로퍼티임. 즉, 부모의 생성자에 있던 val message를 그대로 가져온 것
    ) : IllegalArgumentException(message)

    // 소수점 셋째자리'에서' 반올림 및 형식을 x.xx로 고정
    fun formatToTwoDecimalPlaces(value: Double): String {
        val decimalFormat = DecimalFormat("0.00")
        return decimalFormat.format(value)
    }

    // 스플라인 함수 제작을 위한 데이터
    private val krSizesForSpline = doubleArrayOf(225.0, 230.0, 235.0, 240.0, 245.0, 250.0, 252.5, 255.0, 260.0, 265.0, 270.0, 275.0, 280.0, 282.5, 285.0, 290.0, 295.0, 300.0, 305.0, 307.5, 310.0, 315.0, 320.0)
    private val usSizesForSpline = doubleArrayOf(4.0, 4.5, 5.0, 5.5, 6.0, 6.5, 7.0, 7.5, 8.0, 8.5, 9.0, 9.5, 10.0, 10.5, 11.0, 11.5, 12.0, 12.5, 13.0, 13.5, 14.0, 14.5, 15.0)
    private val jpSizesForSpline = doubleArrayOf(22.5, 23.0, 23.5, 24.0, 24.5, 25.0, 25.25, 25.5, 26.0, 26.5, 27.0, 27.5, 28.0, 28.25, 28.5, 29.0, 29.5, 30.0, 30.5, 30.75, 31.0, 31.5, 32.0)
    private val euSizesForSpline = doubleArrayOf(36.0, 37.0, 37.5, 38.0, 39.0, 39.5, 40.0, 40.5, 41.5, 42.0, 42.5, 43.5, 44.0, 44.5, 45.0, 46.0, 46.5, 47.0, 48.0, 48.5, 49.0, 49.5, 50.5)

    // 데이터를 받아 스플라인 함수를 제작하는 함수
    private val splineInterpolator = SplineInterpolator()

    // 제작된 스플라인 함수들을 저장할 Map
    private val splineMap : Map<Pair<CountryInfo, CountryInfo>, PolynomialSplineFunction> = mapOf(
        // kr size to other sizes
        Pair(CountryInfo.KR, CountryInfo.US) to splineInterpolator.interpolate(krSizesForSpline, usSizesForSpline),
        Pair(CountryInfo.KR, CountryInfo.JP) to splineInterpolator.interpolate(krSizesForSpline, jpSizesForSpline),
        Pair(CountryInfo.KR, CountryInfo.EU) to splineInterpolator.interpolate(krSizesForSpline, euSizesForSpline),

        // us size to other sizes
        Pair(CountryInfo.US, CountryInfo.KR) to splineInterpolator.interpolate(usSizesForSpline, krSizesForSpline),
        Pair(CountryInfo.US, CountryInfo.JP) to splineInterpolator.interpolate(usSizesForSpline, jpSizesForSpline),
        Pair(CountryInfo.US, CountryInfo.EU) to splineInterpolator.interpolate(usSizesForSpline, euSizesForSpline),

        // jp size to other sizes
        Pair(CountryInfo.JP, CountryInfo.KR) to splineInterpolator.interpolate(jpSizesForSpline, krSizesForSpline),
        Pair(CountryInfo.JP, CountryInfo.US) to splineInterpolator.interpolate(jpSizesForSpline, usSizesForSpline),
        Pair(CountryInfo.JP, CountryInfo.EU) to splineInterpolator.interpolate(jpSizesForSpline, euSizesForSpline),

        // eu size to other sizes
        Pair(CountryInfo.EU, CountryInfo.KR) to splineInterpolator.interpolate(euSizesForSpline, krSizesForSpline),
        Pair(CountryInfo.EU, CountryInfo.US) to splineInterpolator.interpolate(euSizesForSpline, usSizesForSpline),
        Pair(CountryInfo.EU, CountryInfo.JP) to splineInterpolator.interpolate(euSizesForSpline, jpSizesForSpline),
    )
}
게시글에 쓸 지 아니면 생략할 지 고민했던 클래스다. 이 부분(#4-5)는 읽지 않아도 본 게시글의 주제인 "객체 지향적 UI 레이어 설계"를 이해하는 데 아무런 지장이 없다.
(1) 값 변환을 위한 스플라인 함수...
4개의 신발 사이즈는 서로 선형적인 관계가 아니다. 무슨 말이냐면, 어떤 사이즈 단위 X와 또 다른 사이즈 단위 Y가 있을 때 aX + b = Y인 관계가 성립하지 않는다는 말이다. 따라서 굉장히 머리아픈 계산이 요구될 것으로 보였다. 샘플 앱이라서 근사값으로 퉁칠까 생각해봤지만, 대충 처리하는 게 마음에 들진 않았다. 다행히 ChatGPT에게 물어보니 Spline 함수를 이용하면, 비선형적인 관계에 대한 관계식을 쉽게 얻을 수 있음을 알게 되었다.
Spline 함수는 살면서 처음 들어보는 함수라서 요약하기 조심스러워진다. 그래도 요약해보자면 "어떤 사이즈 단위 X에 속하는 어떤 값 x와 또 다른 사이즈 단위 Y에 속하는 어떤 값 y에 대해, Y 단위로 변환한 x = y인 (x, y) 데이터셋을 몇 개 넣어주면 얼추 비슷하게 들어맞는 관계식을 뽑아주는 함수"인 것으로 보인다.
(2) sourceSize가 스플라인 함수가 지원하는 input 범위...
스플라인 함수는, 해당 함수를 만들기 위해 넣은 데이터셋의 최솟값 ~ 최댓값의 범위에서만 값을 도출할 수 있다. 이 범위를 벗어나면 에러를 내뱉는다. 따라서, 이 에러를 throw하도록 만든다. 그리고 에러는 ViewModel에서 try-catch문으로 처리한다.
(3) 검증을 통과한 sourceSize...
(2)를 무사히 통과했다면, 변환된 신발 사이즈 값을 return한다.
#5 Unit Test
// package com.example.objectorienteduilayer

import com.google.common.truth.Truth
import org.junit.Before
import org.junit.Test

class ConversionFormulaTest {

    private lateinit var testCases: List<Map<CountryInfo, Double>>

    @Before
    fun setUp() {
        testCases = listOf(
            mapOf(CountryInfo.KR to 225.0, CountryInfo.US to 4.0, CountryInfo.JP to 22.5, CountryInfo.EU to 36.0), // 1
            mapOf(CountryInfo.KR to 230.0, CountryInfo.US to 4.5, CountryInfo.JP to 23.0, CountryInfo.EU to 37.0), // 2
            mapOf(CountryInfo.KR to 235.0, CountryInfo.US to 5.0, CountryInfo.JP to 23.5, CountryInfo.EU to 37.5), // 3
            mapOf(CountryInfo.KR to 240.0, CountryInfo.US to 5.5, CountryInfo.JP to 24.0, CountryInfo.EU to 38.0), // 4
            mapOf(CountryInfo.KR to 245.0, CountryInfo.US to 6.0, CountryInfo.JP to 24.5, CountryInfo.EU to 39.0), // 5
            mapOf(CountryInfo.KR to 250.0, CountryInfo.US to 6.5, CountryInfo.JP to 25.0, CountryInfo.EU to 39.5), // 6
            mapOf(CountryInfo.KR to 252.5, CountryInfo.US to 7.0, CountryInfo.JP to 25.25, CountryInfo.EU to 40.0), // 7
            mapOf(CountryInfo.KR to 255.0, CountryInfo.US to 7.5, CountryInfo.JP to 25.5, CountryInfo.EU to 40.5), // 8
            mapOf(CountryInfo.KR to 260.0, CountryInfo.US to 8.0, CountryInfo.JP to 26.0, CountryInfo.EU to 41.5), // 9
            mapOf(CountryInfo.KR to 265.0, CountryInfo.US to 8.5, CountryInfo.JP to 26.5, CountryInfo.EU to 42.0), // 10
            mapOf(CountryInfo.KR to 270.0, CountryInfo.US to 9.0, CountryInfo.JP to 27.0, CountryInfo.EU to 42.5), // 11
            mapOf(CountryInfo.KR to 275.0, CountryInfo.US to 9.5, CountryInfo.JP to 27.5, CountryInfo.EU to 43.5), // 12
            mapOf(CountryInfo.KR to 280.0, CountryInfo.US to 10.0, CountryInfo.JP to 28.0, CountryInfo.EU to 44.0), // 13
            mapOf(CountryInfo.KR to 282.5, CountryInfo.US to 10.5, CountryInfo.JP to 28.25, CountryInfo.EU to 44.5), // 14
            mapOf(CountryInfo.KR to 285.0, CountryInfo.US to 11.0, CountryInfo.JP to 28.5, CountryInfo.EU to 45.0), // 15
            mapOf(CountryInfo.KR to 290.0, CountryInfo.US to 11.5, CountryInfo.JP to 29.0, CountryInfo.EU to 46.0), // 16
            mapOf(CountryInfo.KR to 295.0, CountryInfo.US to 12.0, CountryInfo.JP to 29.5, CountryInfo.EU to 46.5), // 17
            mapOf(CountryInfo.KR to 300.0, CountryInfo.US to 12.5, CountryInfo.JP to 30.0, CountryInfo.EU to 47.0), // 18
            mapOf(CountryInfo.KR to 305.0, CountryInfo.US to 13.0, CountryInfo.JP to 30.5, CountryInfo.EU to 48.0), // 19
            mapOf(CountryInfo.KR to 307.5, CountryInfo.US to 13.5, CountryInfo.JP to 30.75, CountryInfo.EU to 48.5), // 20
            mapOf(CountryInfo.KR to 310.0, CountryInfo.US to 14.0, CountryInfo.JP to 31.0, CountryInfo.EU to 49.0), // 21
            mapOf(CountryInfo.KR to 315.0, CountryInfo.US to 14.5, CountryInfo.JP to 31.5, CountryInfo.EU to 49.5), // 22
            mapOf(CountryInfo.KR to 320.0, CountryInfo.US to 15.0, CountryInfo.JP to 32.0, CountryInfo.EU to 50.5), // 23
        )
    }

    @Test
    fun sizeToOtherSize_givenTestCases_returnExpectedResult() {
        val countries = arrayOf(CountryInfo.KR, CountryInfo.US, CountryInfo.JP, CountryInfo.EU)

        for (map in testCases) {
            for (sourceCountry in countries) {
                for (targetCountry in countries) {
                    val result = ConversionFormula.sizeToOtherSize(
                        sourceCountry, map[sourceCountry]!!, targetCountry
                    )
                    Truth.assertThat(result).isEqualTo(map[targetCountry]!!)
                }
            }
        }
    }
}
#4-5와 마찬가지로 읽지 않고 넘겨도 본 게시글의 주제인 "객체 지향적 UI 레이어 설계"를 이해하는 데 아무런 지장이 없다. Spline 함수가 제대로 작동하는지 의구심이 들어 만든 ConversionFormula에 대한 테스트 클래스다. 다행히 테스트를 잘 통과한다.
#6 요약
같은 sealed class에 넣음으로써 복수의 이벤트들을 범주화하며, 동시에 객체 지향화한다.
#7 완성된 앱
android-practice/jetpack-compose/ObjectOrientedUILayer at master · Kanmanemone/android-practice
Contribute to Kanmanemone/android-practice development by creating an account on GitHub.
github.com
샘플 앱의 전체 소스 코드다. 심심한 사람은 ObjectOrientedUILayer/docs/KR_to_US_Size_Conversion_(Spline).png에 있는 스플라인 함수의 신기한 x-y 그래프도 확인해보자.
'깨알 개념 📑 > Android' 카테고리의 다른 글
| [Android] Jetpack Compose - Navigation의 Destination 간 데이터 전달 (NavBackStackEntry. (0) | 2024.09.13 |
|---|---|
| [Android] Jetpack Compose - Navigation 기초 (1) | 2024.09.12 |
| [Android] Jetpack Compose - Side-effects (1) | 2024.09.06 |
| [Android] Jetpack Compose - Scaffold (0) | 2024.09.05 |
| [Android] LiveData - Flow로 마이그레이션 (0) | 2024.08.29 |